How to Grow Seedless Grapes at Home, Start to Harvest
Seeded grapes rarely win over a family. Most people want the kind sold in stores, and those varieties will not start from the fruit in your bowl. Learning how to grow seedless grapes begins with the right vine, a sunny site, and hard winter pruning.
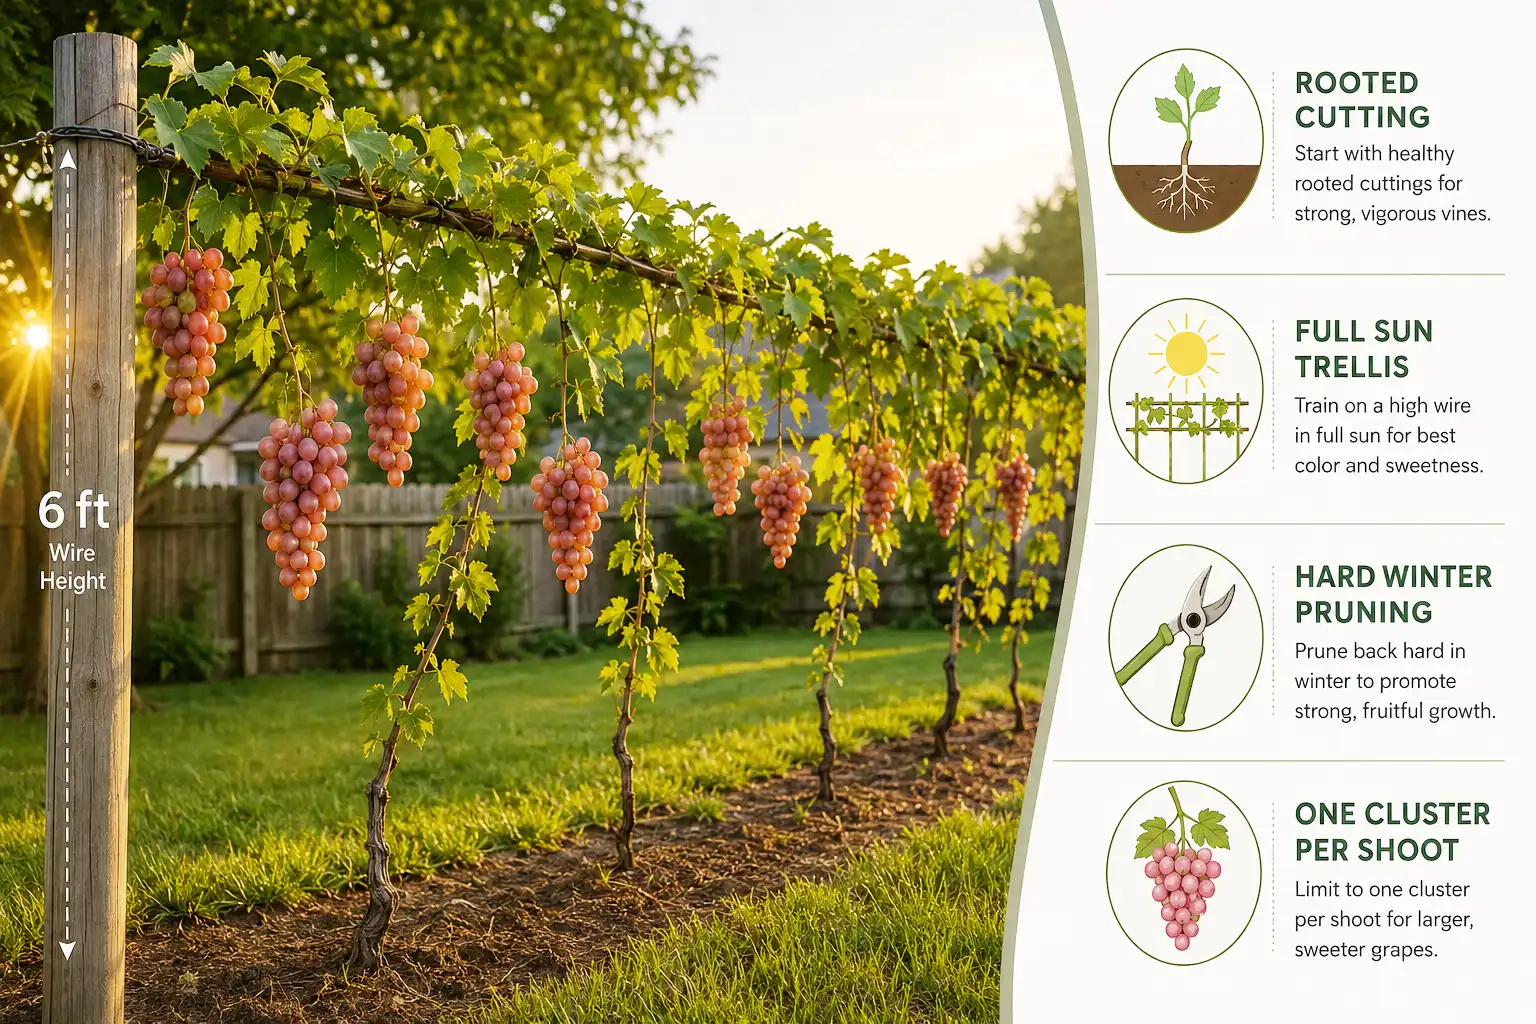
Growing seedless grapes starts with a rooted cutting or nursery vine, never with the fruit. Train the vine on a trellis in full sun. Prune off most of last year’s wood each winter, then thin to one cluster per shoot.
Why Seedless Grapes Will Not Grow From the Fruit
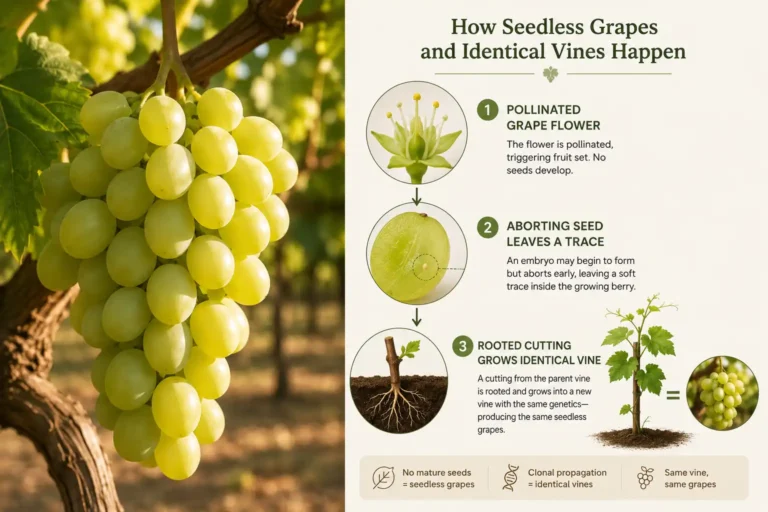
Nothing inside a seedless grape can sprout. Bees pollinate the flower, and fertilization happens the same as any grape. Then the embryo quits early, and the seed coat never hardens. Botanists call that stenospermocarpy. What your teeth find is a soft, hollow trace with no live plant in it.
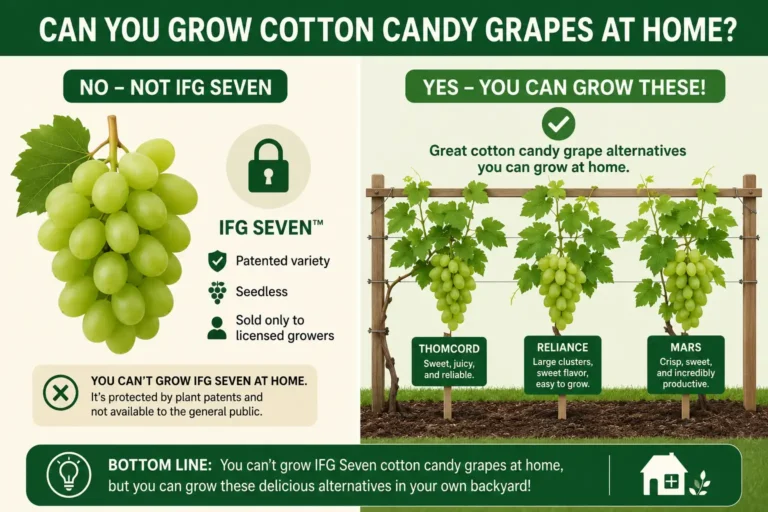
So the question of how to grow grapes from seedless grapes has one honest answer. You cannot. Even a grape with a live seed would not come true. Grape seedlings differ from the parent vine, usually for the worse. Every seedless vine sold today is a clone cut from wood. The work behind how breeders create seedless grape varieties runs through embryo rescue and decades of crossing.
That leaves two honest starting points. Both give you the exact variety you picked.
- Dormant nursery vines. One or two year old rooted plants. Fastest, cleanest, and the only legal route for patented or trademarked cultivars.
- Hardwood cuttings taken from a known seedless vine nearby, or from a friend’s vine.
Cost pushes most first timers toward nursery plants. Cuttings make sense once you already have access to a proven vine and want three or four more of it.
Read next: Cotton Candy Grapes in Season
How to Grow Seedless Grapes From Cuttings
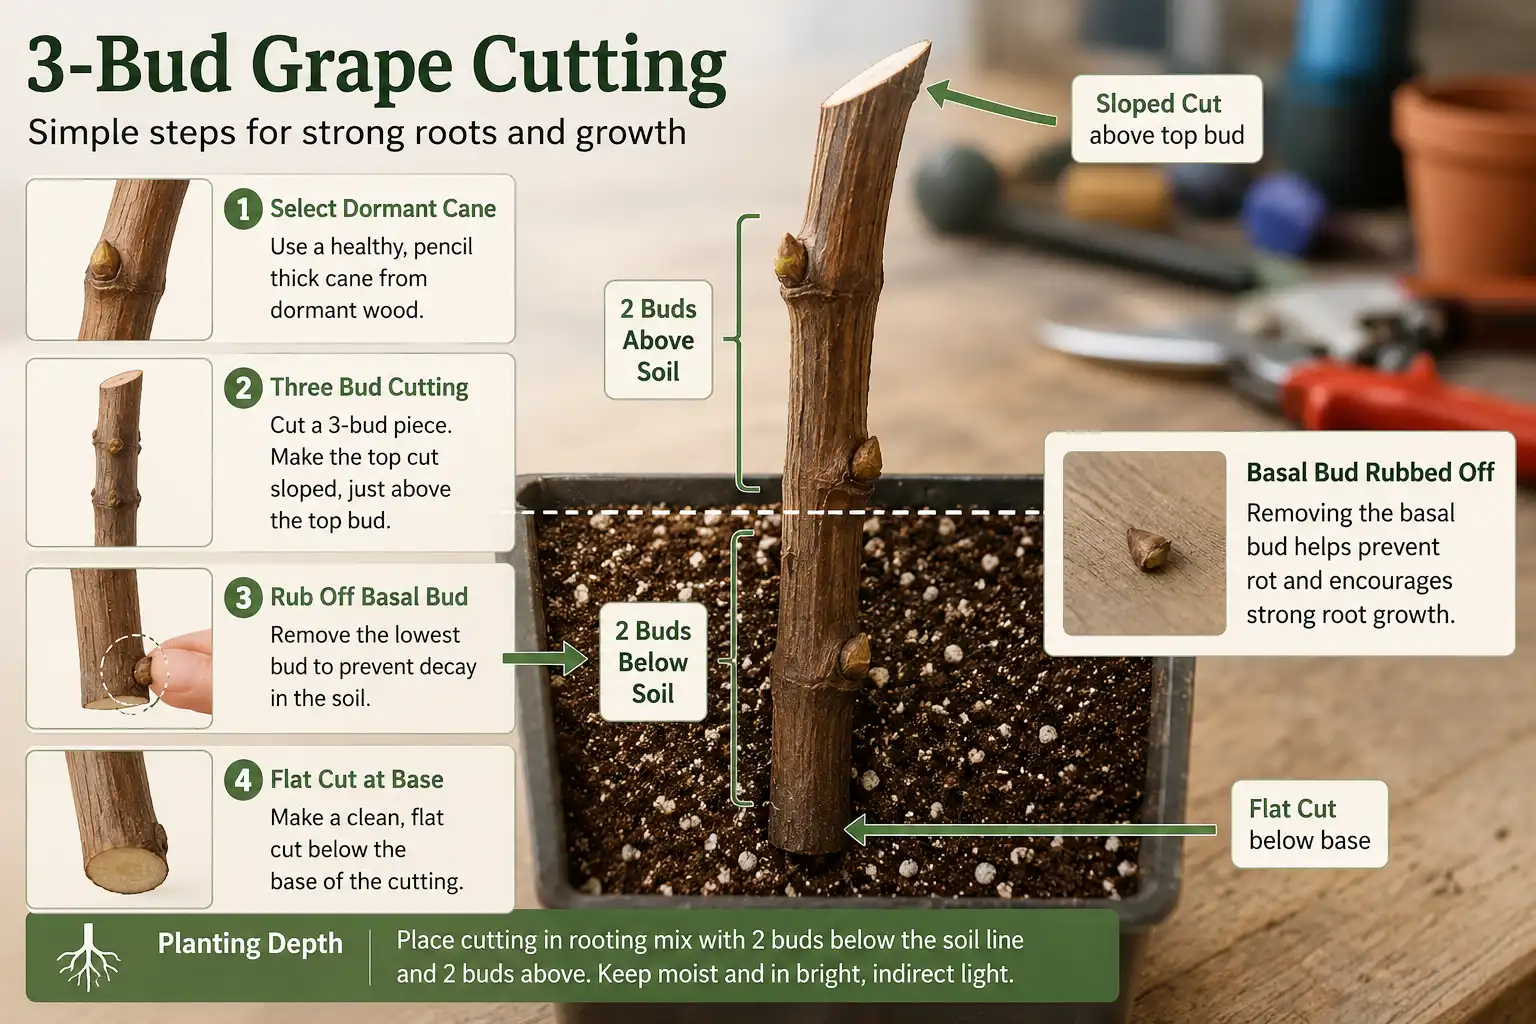
Cut the wood in late January or early February, while the vine sits fully dormant. Pick canes that grew the previous season in full sun. Shaded canes run spindly and carry too little stored food to push roots. K-State Research and Extension puts the target diameter at one third to one half inch. That feels close to a pencil.
Here is the sequence:
- Cut to length. Make each cutting three to four buds long. Slope the top cut just above the top bud. Cut flat below the bottom bud, so you never plant one upside down.
- Store cold. Bundle them, bag them with moist sawdust or peat, then hold them at 40 to 45 degrees F.
- Rub off the basal bud. That single step pushes callus and root formation instead of a shoot.
- Stick them. Set each cutting in loose rooting mix with two buds below the surface and two above.
- Give them warmth. Hold the mix at 70 to 75 degrees F. Shoots and roots usually show inside two weeks.
- Harden off, then plant. Once a cutting carries 12 inches of new growth and a real root ball, move it outside for several days first. Rooted cuttings burn easily in a late frost.
One rule matters legally. Patented and trademarked cultivars cannot be propagated, and most newer club grapes fall in that group. Stick to older public releases for cuttings. This longer walkthrough on rooting grape vines from cuttings covers the direct field method too.
Best Seedless Grape Varieties for Backyard Growers
Variety choice decides more than anything else you do. Winter lows filter the list first, then season length, then disease pressure. Most supermarket grapes come from Vitis vinifera. Those will not survive a Kansas winter. So backyard growers lean on American and hybrid seedless types.
| Variety | Color | Cold tolerance | Ripens | Notes for home growers |
|---|---|---|---|---|
| Reliance | Pink to red | Very hardy | Early mid season | Tender skin, sweet labrusca flavor. Cracks in wet years. |
| Mars | Blue | Hardy, vigorous | Mid September | Slipskin. Compact clusters resist cracking. Best disease resistance here. |
| Jupiter | Reddish blue | Fairly hardy | Early | Large firm berries, muscat flavor, non slipskin. |
| Venus | Blue black | Moderately hardy | Early | Large berries, heavy vigor. |
| Himrod | White to gold | About minus 20 F | Early September | Honey flavor, loose clusters. Runs to excess vigor. |
| Interlaken | Green gold | About minus 15 F | Before Himrod | Good for short seasons, and more productive. |
| Canadice | Red | Hardier than most seedless | Early September | Small berries, excellent flavor. Trunk injury in hard winters. |
| Vanessa | Red | Among the hardiest seedless | Mid to late September | Crisp, non slipskin, top eating quality. |
| Marquis | White | Moderate | Mid to late September | Large berries. Flavor improves 10 to 14 days on the vine. |
K-State lists Reliance, Mars, Jupiter, and Venus for Kansas gardens. Those four are recognized as strong performers in this growing region. Mars and Jupiter came out of the University of Arkansas program. Himrod, Interlaken, Canadice, Vanessa, and Marquis came from Cornell and the New York station, and UMass Extension rates them for cool, humid regions.
Skip Thompson Seedless and Flame Seedless outside the dry West. Both want a long, hot, dry season and mild winters. In humid country they rot, and on the Great Plains they freeze out.
Site, Soil, and Sun a Seedless Vine Needs
Give the vine eight hours of direct sun and never less than six. Sun drives sugar, and shaded seedless grapes stay sour no matter how long you leave them hanging.
Pick the site on drainage first. Grapes want deep, well drained loam, and roots need four to six feet of workable soil. Feeder roots sit mostly in the top two to five feet. Wet ground kills vines faster than cold does.
A few site details are worth checking before you dig:
- Slope and air flow. A gentle south slope warms earlier and drains cold air away. Skip low frost pockets and the bottom of a hill.
- Soil pH. Target 5.5 to 6.5. Above 7.3, elemental sulfur brings it down, though the work repeats where irrigation water runs alkaline.
- Soil test. Pull a sample the fall before planting and send it through your extension office. Fixing phosphorus and potassium after the vine is in gets awkward.
- Herbicide drift. Grapes rank among the most sensitive plants to 2,4-D and dicamba. Out here that matters. Keep vines well away from row crop field edges.
- Old sod. Till the fall before planting to kill perennial weeds like bindweed and brome.
Work compost into heavy clay ahead of planting. Never put fertilizer in the planting hole.
How to Plant a Seedless Grape Vine
Plant dormant vines in early spring, before hot weather arrives. In Kansas that runs late March into early April. Zones farther north push into April or May. The best time to plant grape vines tracks your own last frost more than the calendar.
Set the plant at the same depth it grew in the nursery. Dig wide enough to spread the roots without folding them, and trim any broken or overly long root. Then cut the top back to one strong cane with two buds. That hard cut feels wrong the first time. It builds a straight trunk instead of a tangle.
Spacing depends on vigor:
- American and hybrid seedless types: 7 to 8 feet apart in the row
- Vinifera types: 6 to 7 feet apart
- Rows: about 9 feet apart in a backyard
Water the vine in, then mulch a few inches deep to hold moisture and slow weeds. A single vigorous vine covers a lot of fence, so two or three plants feed most families. Container growing works for a season or two, but roots outgrow a pot fast and winter protection gets tricky.
Trellis and Training Through the First Three Years
Build the trellis in the first or second season, before the crop load arrives. A mature vine carries real weight, so set it like a fence. End posts go deeper than line posts. Space line posts 24 feet apart with room for three vines between them. Put the top wire 5 to 6 feet up and the bottom wire 30 to 36 inches up. Tighten the wires every spring before growth weighs them down.
K-State recommends three systems for this region. Single curtain suits vigorous, hardy vines like Mars. Umbrella Kniffin suits vines that are less vigorous or more prone to winter injury. Four cane Kniffin works too, though upper foliage shades the lower wire.
Here is how the first four seasons run:
| Season | What you do | What you get |
|---|---|---|
| Year 1 | Train one shoot up a stake toward the top wire. Strip everything else. | A straight trunk |
| Year 2 | Pinch the tip below the wire. Train two side shoots along it as cordons. Tie every 8 to 10 inches. | Permanent arms |
| Year 3 | Leave 2 to 4 fruiting spurs of 3 to 5 buds. Cut everything else to two bud renewal spurs. | First light crop |
| Year 4 and on | Keep 4 to 6 fruiting spurs and 4 to 6 renewal spurs per cordon. | 10 to 20 pounds per vine |
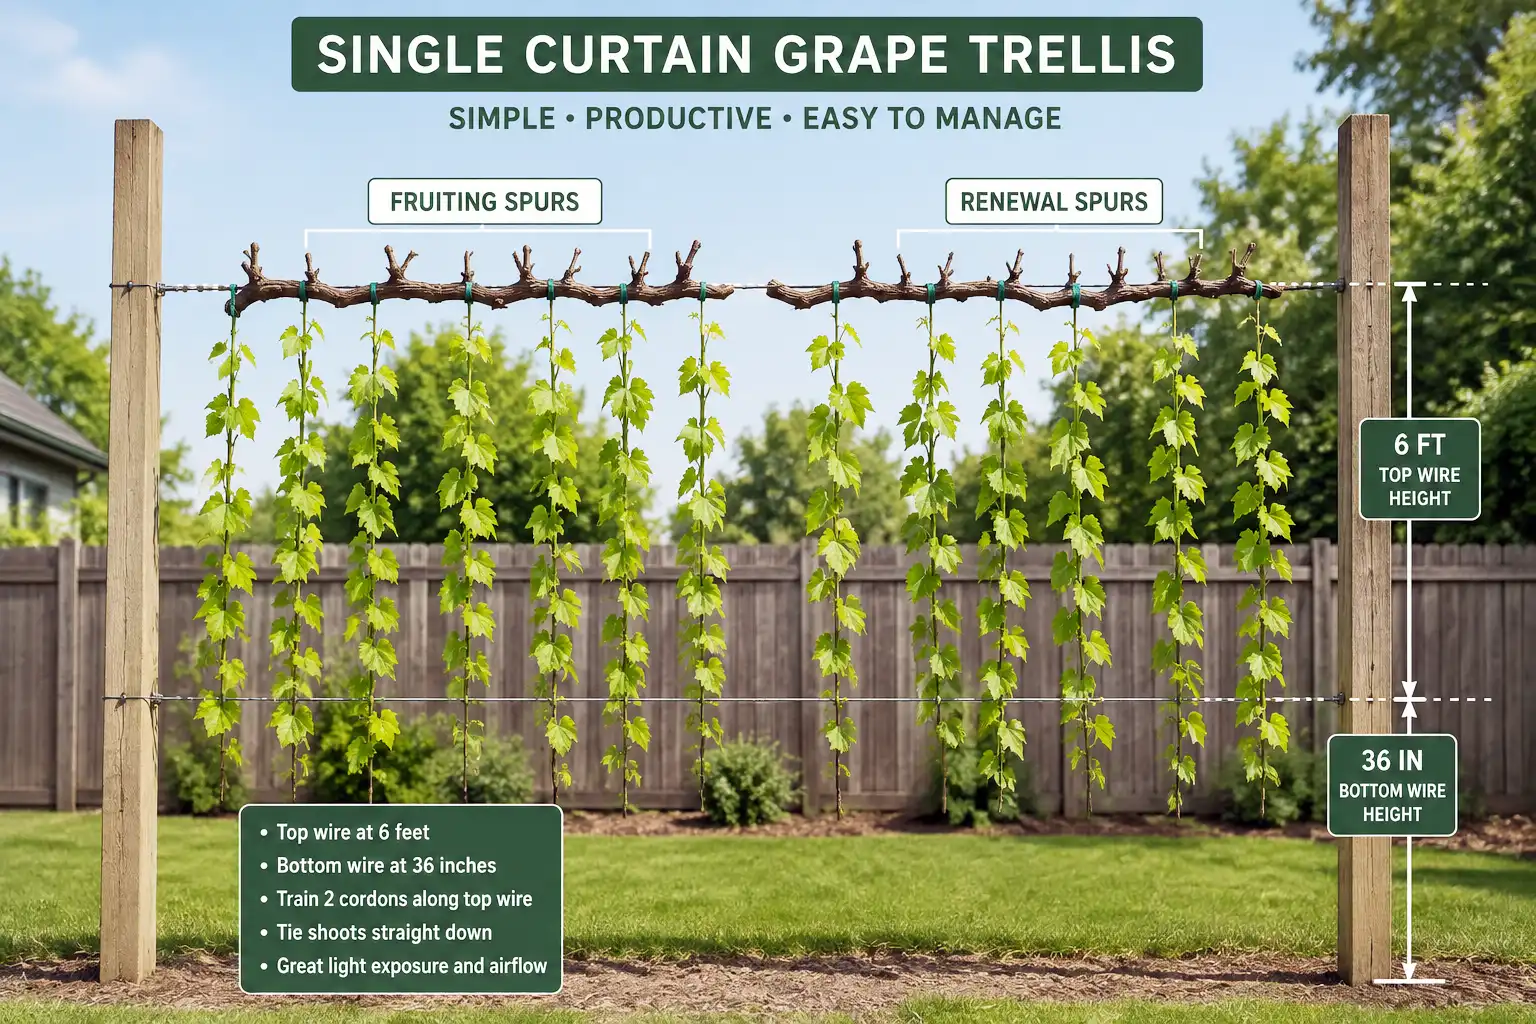
Every dormant season you remove 80 to 90 percent of last year’s wood. Under pruning is the most common backyard mistake. Mature vines hold roughly 40 to 60 buds total. Pruning is typically done in late February or early March in this region. Early winter cuts expose buds to cold, and late cuts bleed sap. The same rules apply when you prune an established grape vine of any type.
Watering and Feeding Without Pushing Too Much Growth
Water at the root, not overhead. Wet fruit rots, and overhead sprinklers during ripening invite bunch rot on thin skinned clusters. Drip works best. Run two emitters per vine, one on each side about 12 inches out. Use half gallon per hour emitters, so a forgotten timer cannot drown the roots.
Young vines need steady moisture through their first two summers. Mature vines pull from deep soil and only need help in a dry stretch. Water matters most from bloom through color change, since that window sets berry size. Then back off close to harvest, because late water dilutes sugar and splits tender berries.
Grapes need very little fertilizer. Overfeeding causes far more trouble than underfeeding, because excess nitrogen grows shade instead of fruit. A balanced 10-10-10 or 12-12-12 covers it:
| Vine age | Amount per vine | Timing |
|---|---|---|
| Year 1 | 1/2 cup | As growth starts, repeat once a month later |
| Year 2 | 1 cup | As buds swell |
| Year 3 | 1 to 1.5 cups | As buds swell |
| Year 4 and on | 1 to 2 cups | As buds swell |
Band it 1 to 1.5 feet out from a young plant. Widen that to 2 or 3 feet on a mature vine. Work it two inches into the soil. Then read the vine instead of the bag. Healthy fruiting canes finish 4 to 6 feet long and slightly thicker than a pencil. Longer and fatter than that means cut the nitrogen next year.
Cluster Thinning Decides Your Berry Size
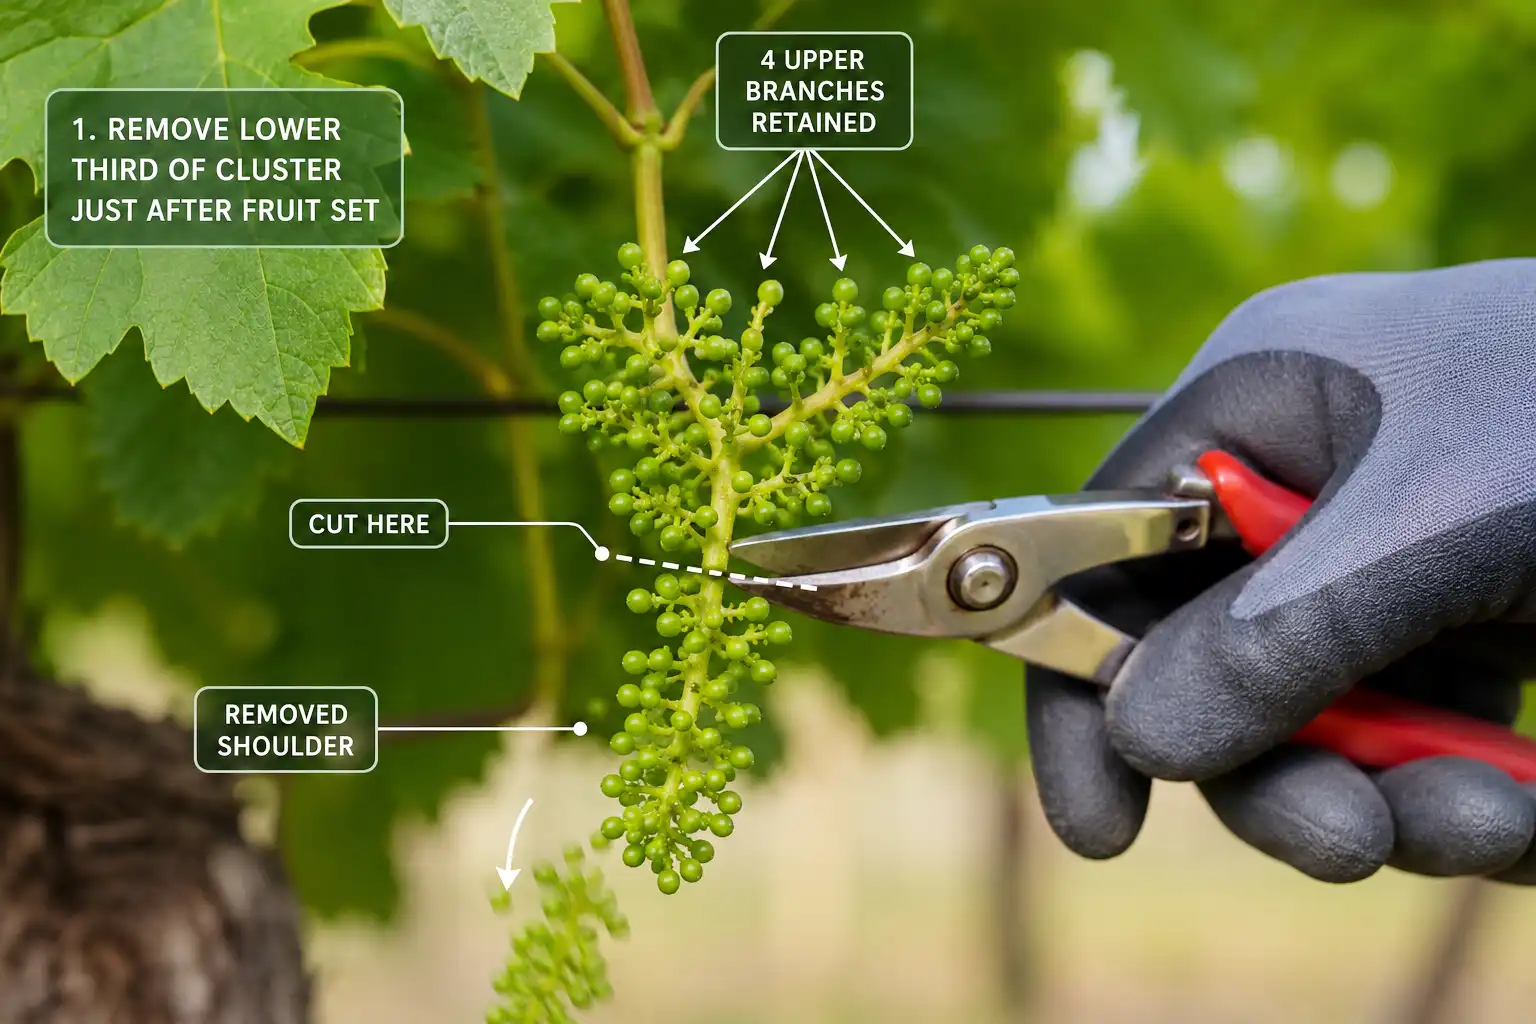
Thinning separates backyard seedless grapes from store fruit. Seeds normally release growth hormones that swell a berry. Seedless berries never get that signal, so they stay small unless you cut the crop load. Commercial growers spray gibberellic acid and girdle canes to make up the difference. Neither practice is worth the trouble at home. Thinning does the same job with pruners.
Work through the vine right after fruit set, when the flower parts drop. That timing matters. Thinning before color change increases berry size. Thinning after color change mostly just cuts your yield.
Do it in two passes.
Pass one, cluster thinning. Leave one cluster per shoot. Where a shoot carries two or three, remove the ones farthest out. Strip every cluster off shoots shorter than 12 inches, since those shoots cannot ripen fruit. Drop anything undersized, oversized, misshapen, or tangled into a neighbor. Target 20 to 40 clusters on a mature vine.
Pass two, cluster tipping. Snip the bottom third to half off each remaining cluster. Leave four or five branches near the base. The lower shoulder is the tightest part and ripens last. Cutting it gives you rounder clusters, bigger berries, better airflow, and much less rot.
Both passes feel brutal. Ten pounds of good grapes beats twenty pounds of sour BBs. Plus the vine builds better reserves for next year.
Canopy Work and Disease Control on Thin Skinned Fruit
Open the canopy, because seedless table grapes carry thin skins and tight clusters. Both traits invite rot. Sunlight and moving air do more for fruit quality than any spray.
Two summer jobs handle it. First, position shoots. On a single curtain vine, pull shoots away from the wire once they pass four feet. Let them hang straight down. That exposes clusters at the top of the canopy. Second, pull leaves. Remove two to four leaves per shoot in the fruit zone. Work only the morning sun side, or you will sunburn the berries. Do it when berries reach pea size, around late June here.
Black rot is the number one grape disease in Kansas. Fruit stays vulnerable from bloom until about six weeks after. Phomopsis, powdery mildew, downy mildew, and Botrytis bunch rot all show up too. A protectant program beats a rescue attempt, so spray on the calendar:
- New shoots 2 inches long
- New shoots 6 to 15 inches long
- Just before bloom
- Just after bloom
- Cover sprays every 10 to 14 days into mid or late July
Watch for grape flea beetle at bud swell, grape berry moth after bloom, and Japanese beetles through midsummer. Japanese beetles hit hard in northeast Kansas, and the K-State demonstration garden in Johnson County nets vines during peak flights. Read every label for the preharvest interval before you mix anything.
Keeping Birds and Raccoons Out of Ripe Clusters
Net the vines before the fruit colors up, not after. Birds find sweet, seedless, thin skinned grapes before you do, and a flock clears a backyard row in two mornings.
Lightweight black polypropylene netting with half inch mesh costs the least and works well. It does snag on itself and on the vines. Woven mesh netting handles easier and costs more. A trellis with a 6 foot top wire needs netting at least 14 feet wide, so it drapes both sides. Then close the bottom edge with clothespins or clips. Birds walk in under a loose skirt. More detail on keeping birds off ripening grapes covers the other options.
Raccoons arrive as fruit softens, and they climb straight through netting. Two strands of electric fence stop them. Set the first wire about 5 inches off the ground and the second about 9 inches. Woven electric wire bends around corners easier than solid wire, and a battery fencer gives you placement freedom. Turn the charger on before the grapes get close to ripe. Once a raccoon tastes the crop, it stops caring about the shock. Keep weeds off the wire so they cannot short it out.
When Are Seedless Grapes Ready to Pick?
Taste, do not look. Most grape varieties color up two to three weeks before they are ripe. Color fools nearly every new grower. A red seedless grape turns red long before it turns sweet.
Check three signals together:
- Flavor. Pull berries from the top, middle, and bottom of several clusters. Ripe seedless grapes taste sweet with a light tang, not thin or green.
- Sugar. Table grapes eat best between 16 and 20 Brix. A cheap refractometer at grape harvest turns guessing into a number, and sampling many berries beats sampling one.
- Cluster stem. The stem browns and turns woody as fruit finishes, and berries release from the pedicel more easily.
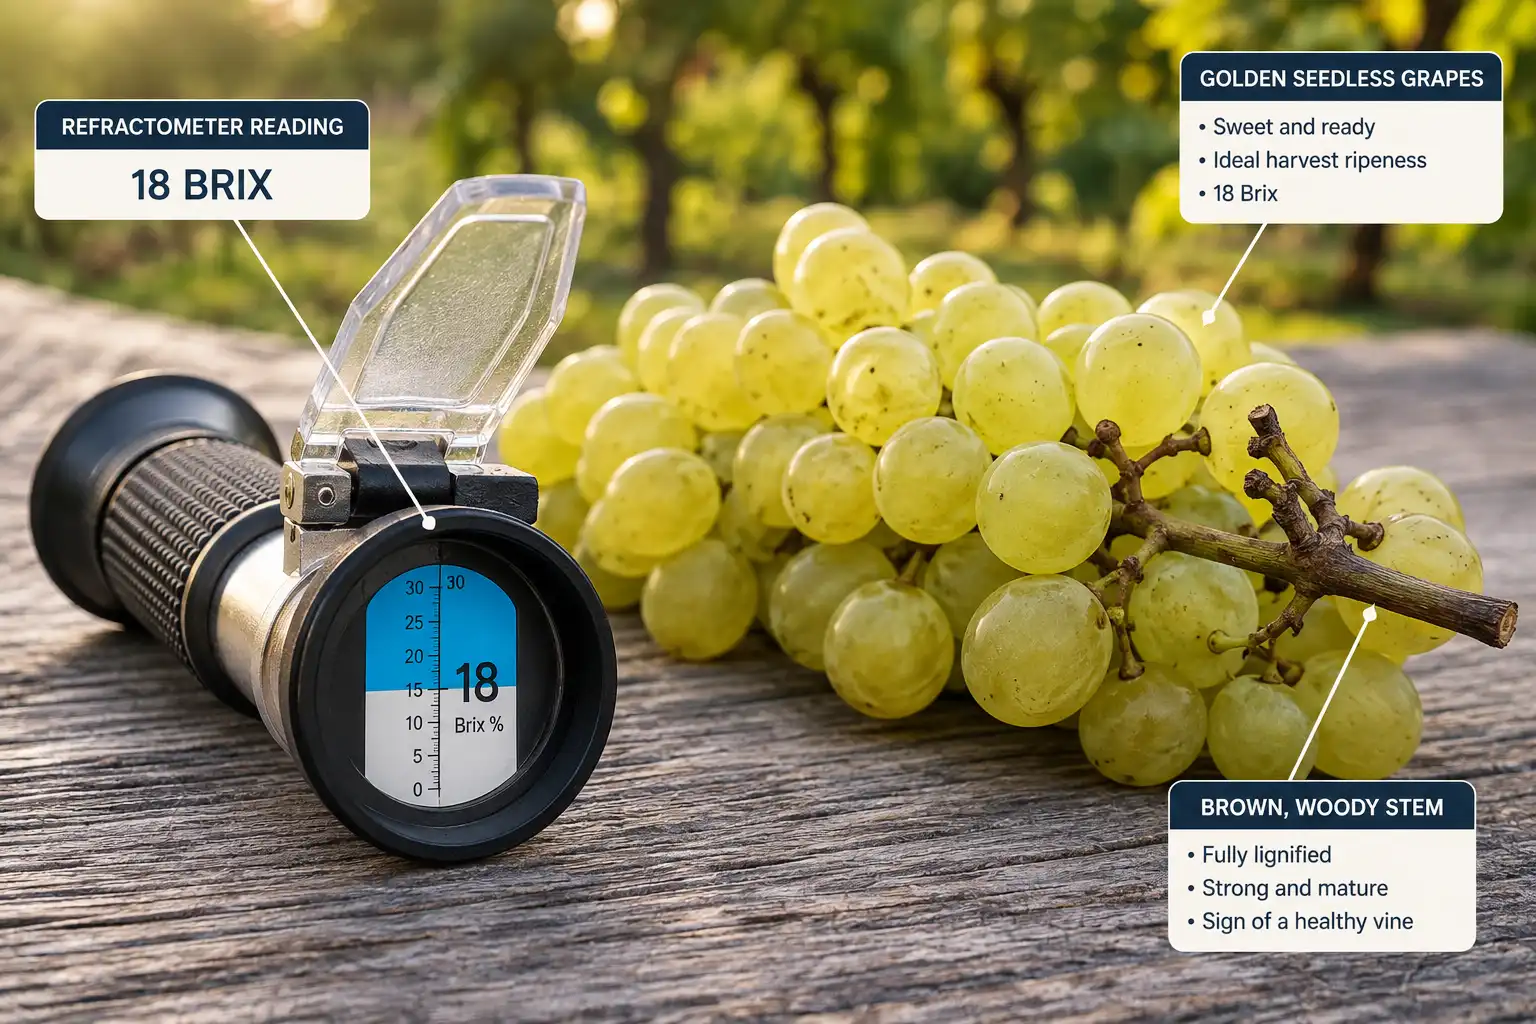
Grapes are non climacteric. They stop gaining sugar the second you cut the cluster, so nothing improves on the counter. Leaving fruit hanging is your only ripening tool. Sun exposed clusters develop the best flavor, which is another argument for opening the canopy.
Pick in the cool morning. Cut stems with pruners instead of pulling. Hold clusters by the stem to protect the bloom on the skin, then refrigerate promptly. Most home seedless varieties ripen between late August and late September. A few, like Marquis, keep improving on the vine for another 10 to 14 days.
Mistakes That Keep Backyard Seedless Grapes Small and Sour
Most disappointing vines trace back to the same handful of errors:
- Not pruning enough. Leaving more than 10 to 20 percent of last year’s wood produces weak shoots, small clusters, and uneven ripening.
- Letting the vine carry everything it sets. No thinning means small, late, sour berries every season.
- Planting a warm climate variety. Thompson Seedless in zone 6 will not end well.
- Too much nitrogen. Extra shoots shade the fruit and feed mildew.
- Overhead watering into harvest. That is how tight clusters turn to mush.
- Fruiting in year two. Strip those clusters. Let the trunk and roots build first.
- Picking on color. Wait for taste and sugar instead.
- Skipping early sprays. Black rot infects at bloom, and a July spray cannot undo a May infection.
Final Verdict about Grow Seedless Grapes
Get three things right and seedless grapes are easy across most of the country. Start from a rooted cutting or a nursery vine of a cultivar rated for your winter lows. Give it full sun, drainage, and a trellis you build once. Then prune hard every February and thin to one cluster per shoot in June.
Around Topeka it helps to set two vines of Mars and one of Reliance. Run drip to each, then plan on a real crop in year four. Skip the extra fertilizer, skip the fancy hormones, and net the row before the fruit turns color. That is the whole program.