When to Harvest Spring Wheat: Moisture, Stage, and Timing
Spring wheat gives you a short window between hard dough and shatter loss. Knowing when to harvest spring wheat comes down to grain moisture, kernel feel, and the weather ahead of your combine. Cut early and you pay to dry. Wait too long and grade slides.
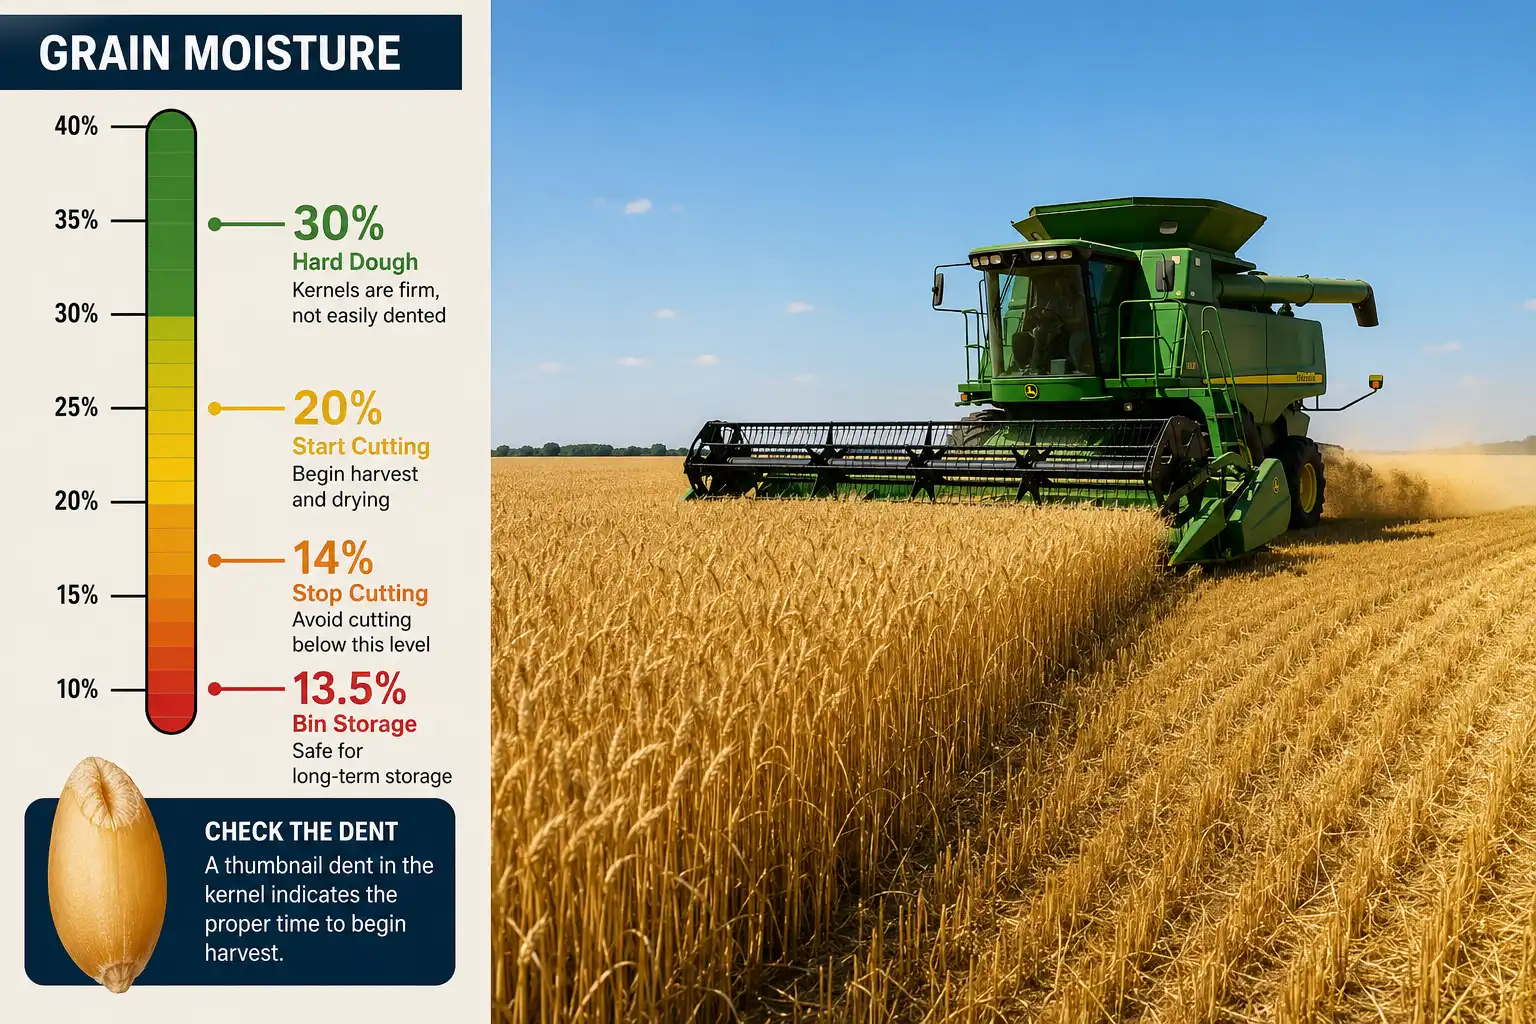
Harvest spring wheat when grain moisture falls between 20% and 14%. The crop reaches physiological maturity near 30% moisture at hard dough, then dries roughly 2.5% per day. Start cutting at 20% to protect falling number.
Know more: When Do You Harvest Wheat: Moisture, Stages, and Timing
What Growth Stage Means Spring Wheat Is Ready to Cut?
Spring wheat is fit to cut once kernels move past hard dough and turn hard clear through. Six stages follow flowering: watery ripe, milk, soft dough, hard dough, kernel hard, and harvest ripe. North Dakota State University puts physiological maturity at hard dough, when grain moisture sits near 30% to 35%.
At that point the kernel holds its maximum dry weight. The plant adds no more starch or protein, so yield and protein both stop moving. Waiting longer will not raise either number.
Kernels inside a single head also ripen at different times. The middle of the head matures first, then the tip and base catch up. So you sample several heads instead of trusting one.
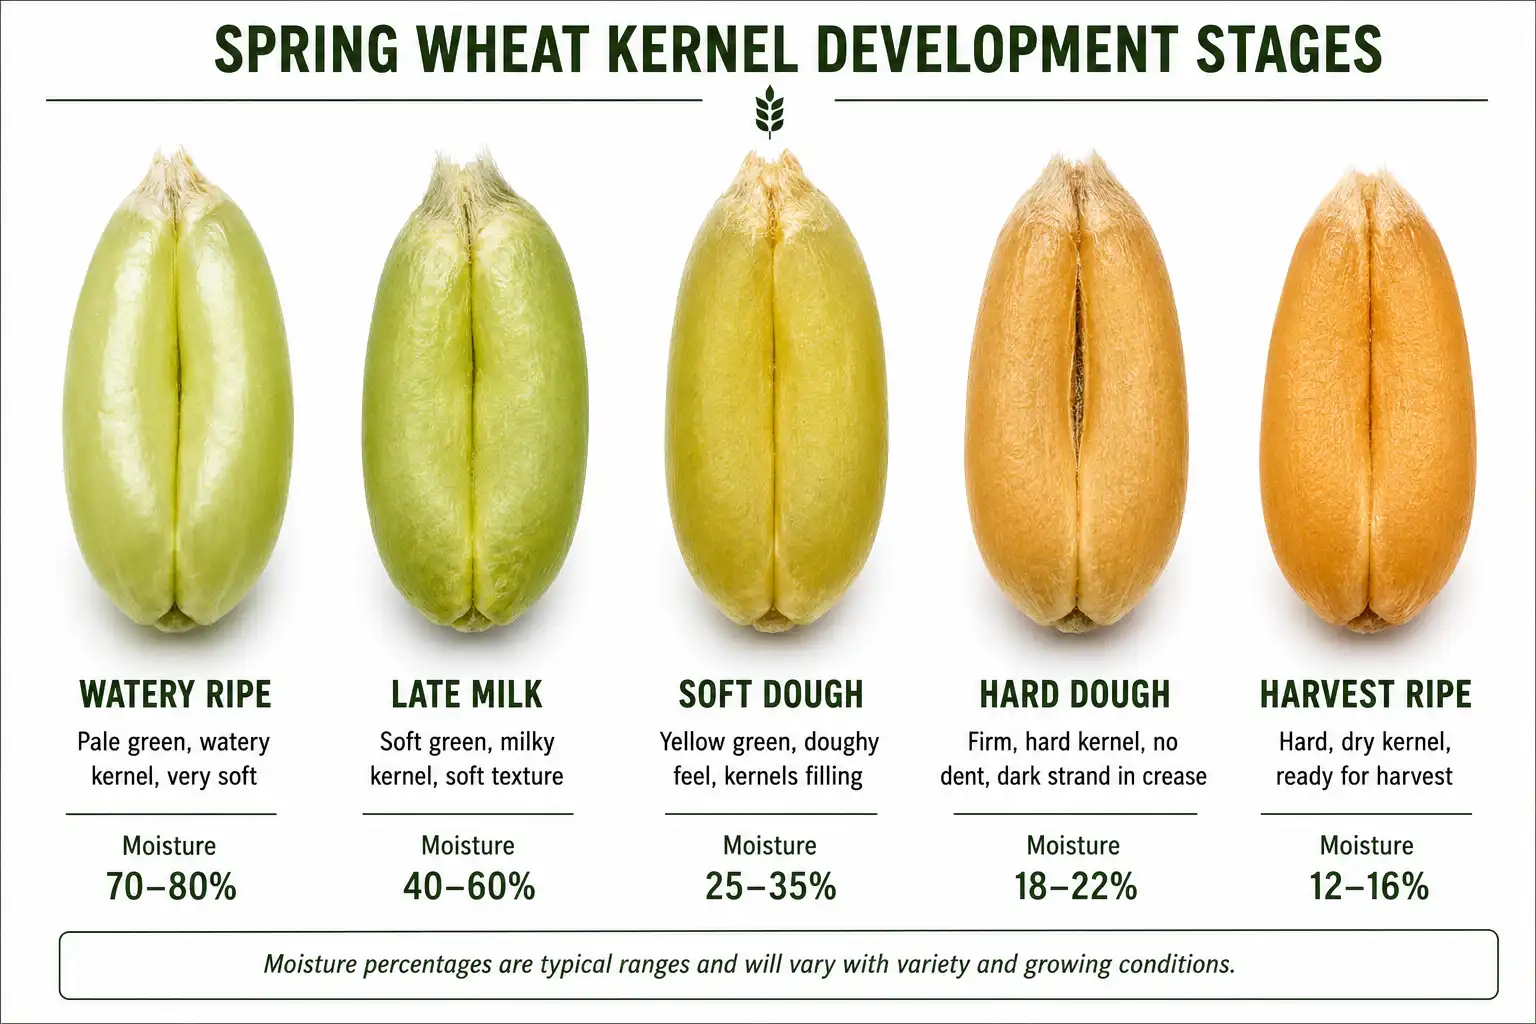
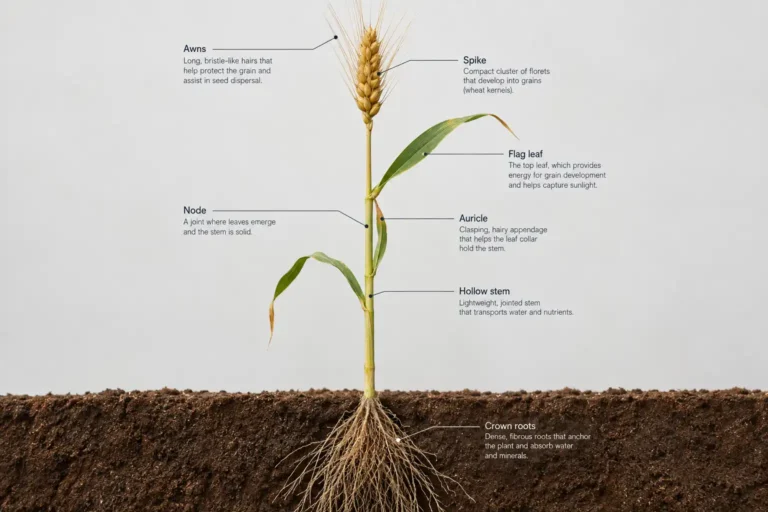
Two visual signs mark maturity. Green drains out of the peduncle, the short stem right below the head. A dark pigment strand shows up along the kernel crease. Once both appear, grain fill has ended, and your job shifts from protecting yield to protecting quality. That habit of reading maturity signs across crops saves guesswork on every field. Oats run the same kernel stages, so oat harvest timing leans on the same checks.
What Grain Moisture Should Spring Wheat Be at Harvest?
Cut spring wheat between 20% and 14% grain moisture. NDSU tells growers to roll once the crop hits 20%. Finish before it drops under 14%, because threshing cracks kernels below that line.
Drydown moves fast. Wheat sheds about 2.5% moisture per day between 40% and 20%. So a field can slide from ripe to over-dry inside three or four days of hot wind. That speed is the whole reason you scout daily instead of weekly.
Starting at 20% costs you drying dollars, and it buys real protection. Every rain or heavy dew on ripe standing grain chips away at test weight and raises sprout risk. Cutting wet and drying down beats leaving grain out for one more storm.
| Grain moisture | What it means | What to do |
|---|---|---|
| 30% to 35% | Hard dough, physiological maturity | Yield locks in; stage pre-harvest work |
| 20% to 25% | Ripe, straw still tough | Start cutting if you can dry |
| 16% to 20% | Prime straight-cut window | Cut hard, then dry to 13.5% |
| 14% to 16% | Marketable with light drying | Cut and store on aeration |
| Below 13% | Over-dry | Lost weight, more cracked kernels |
Most elevators set 13.5% as the base for hard red spring wheat. Above 14% you take a moisture discount plus a shrink factor. Below 13.5% nobody pays you back for the water you removed, so over-drying quietly gives away bushels.
How Do You Check Spring Wheat Moisture in the Field?
Pull heads from several spots, run a thumbnail test, then confirm with a meter. Field checks tell you the stage, while the meter gives you the number your buyer cares about.
The Thumbnail Test
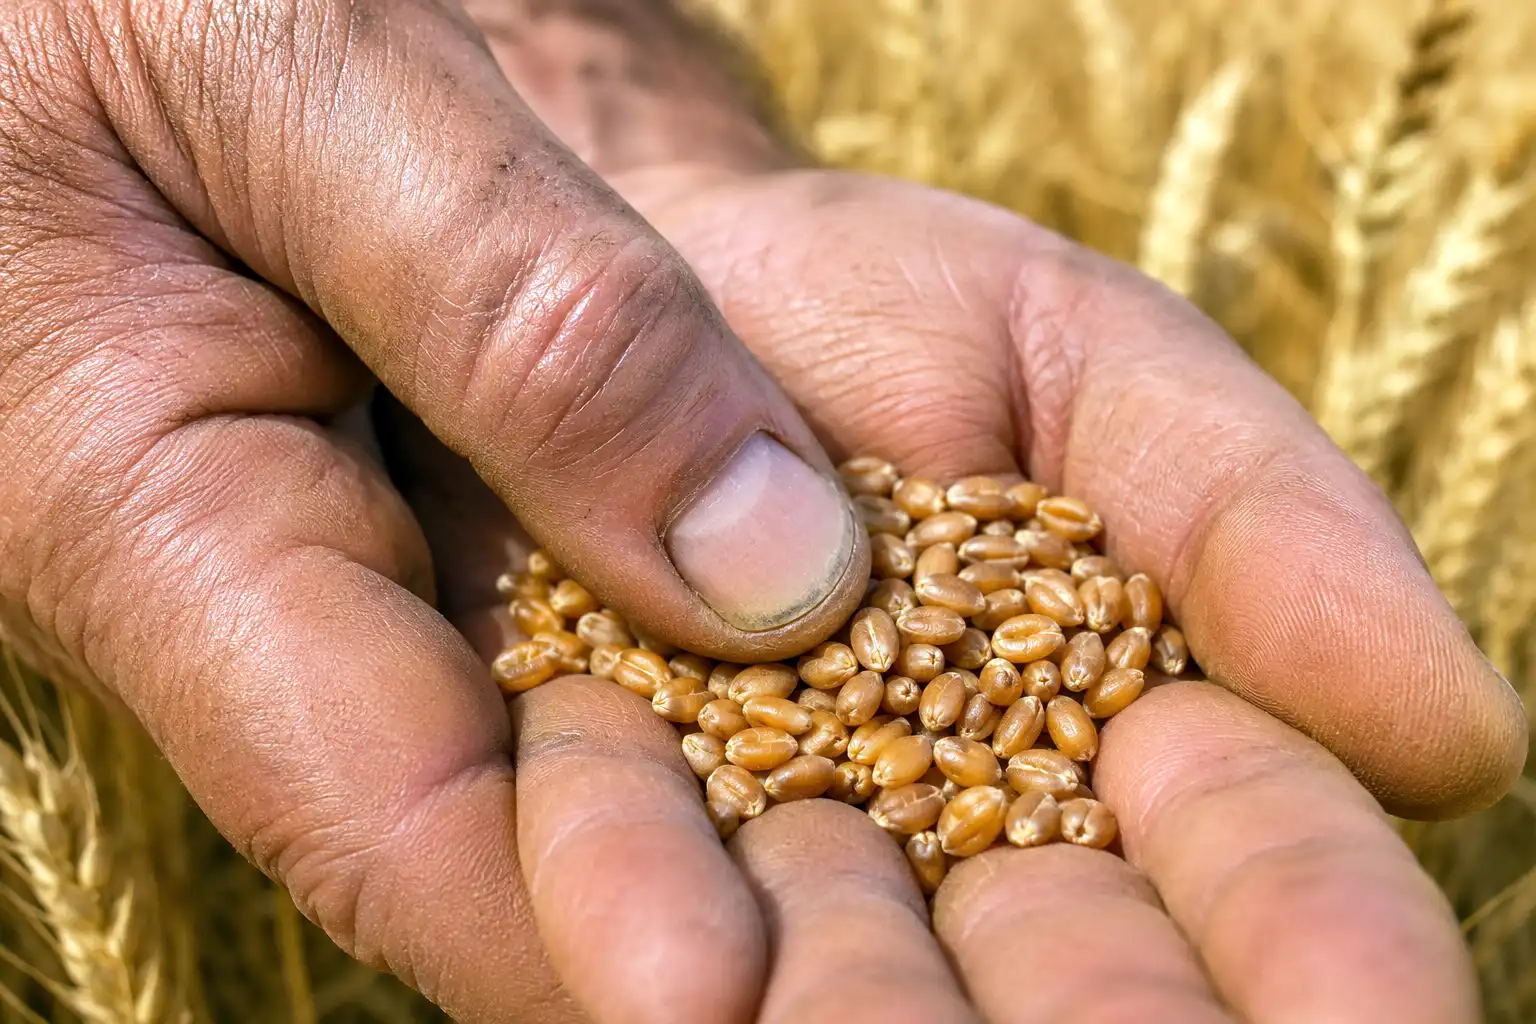
Shell out a head into your palm and press a thumbnail into a kernel. If the dent holds, moisture is under 30% and the crop has reached hard dough. If the kernel springs back, grain fill is still running.
Do this on 20 kernels taken from the center of different heads, spread across the field. One spot never represents 40 acres.
The Peduncle and Pigment Strand Checks
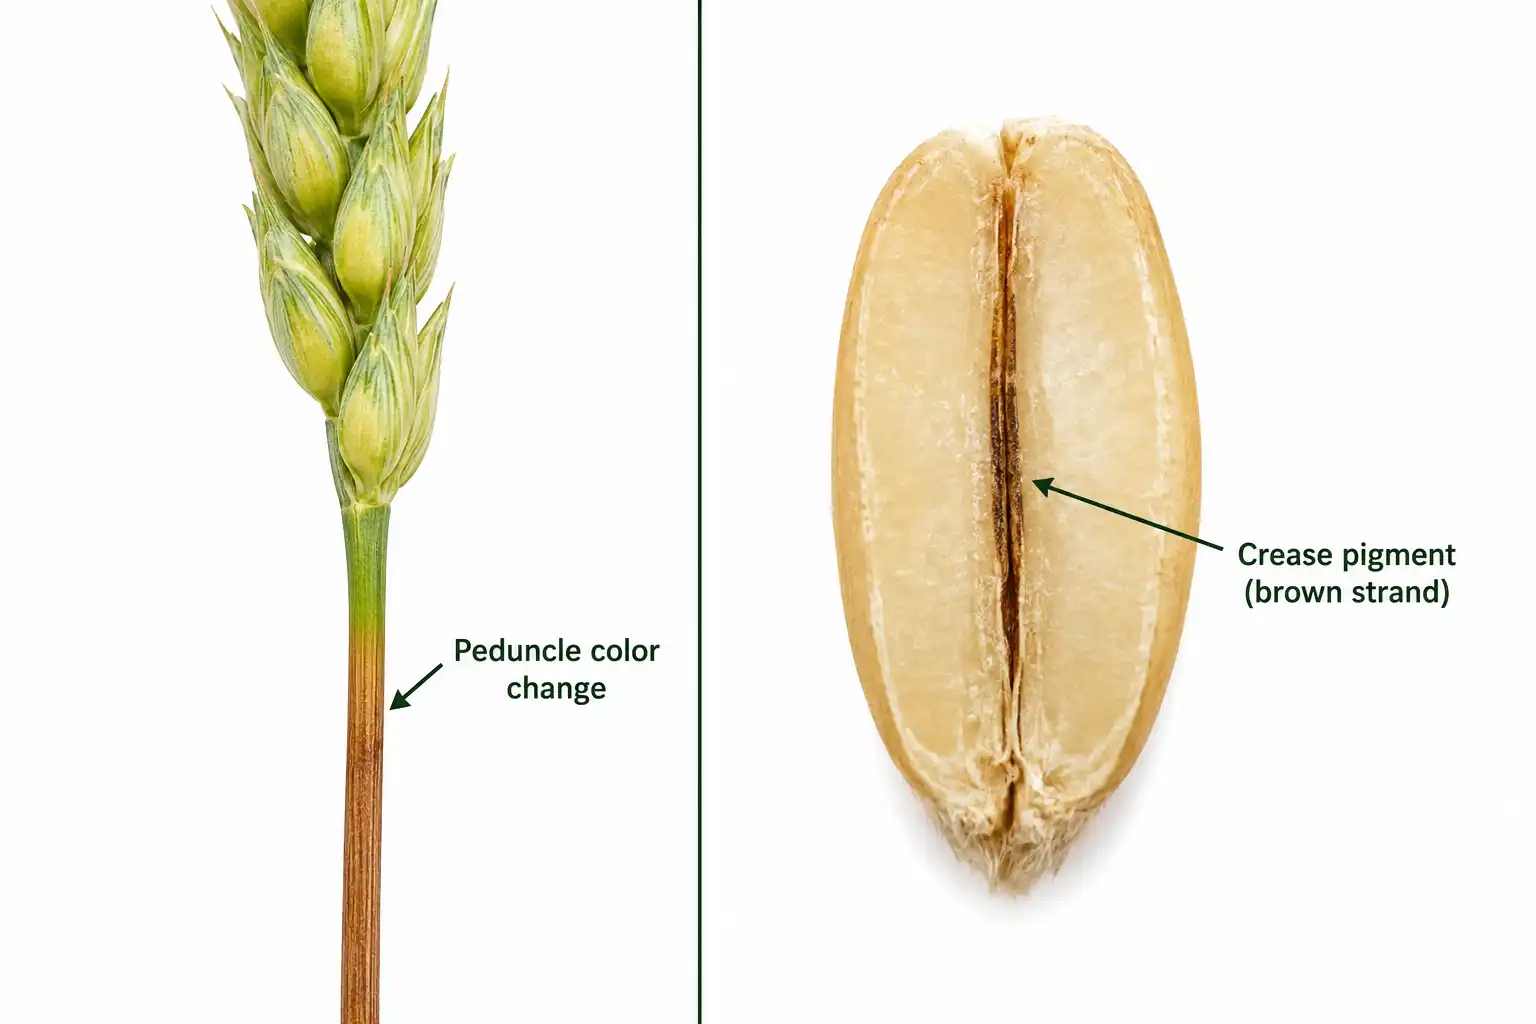
Two more checks confirm the same call. Watch the peduncle below the head: once green fades to brown, the plant has stopped feeding the kernel. Then slice kernels lengthwise and look in the crease. When 75% of them show a dark pigment strand, you are at roughly 30% moisture. If every kernel shows it, you are already below 30%.
Sample the least mature part of the field, not the best. Low spots, late tillers, and weedy patches set your real timing. After that, a handheld grain moisture tester settles the question before the combine leaves the yard.
When Does Spring Wheat Harvest Start in Each Region?
Spring wheat harvest runs from late July through mid September across the northern Plains and Northwest. South Dakota and Washington usually cut first, and North Dakota and Montana finish last.
USDA NASS gives you a running benchmark. National harvest normally shows about 2% complete in the last week of July. From there it reaches single digits in early August, then finishes near mid September. In 2026 the crop sat at 5% harvested by August 2, slightly behind the five-year average of 8%.
| Area | Typical harvest window |
|---|---|
| South Dakota | Late July to late August |
| Washington and Idaho | Late July to early September |
| Minnesota, central to north | Late July to end of August |
| North Dakota | Early August to mid September |
| Montana | Early August to early September |
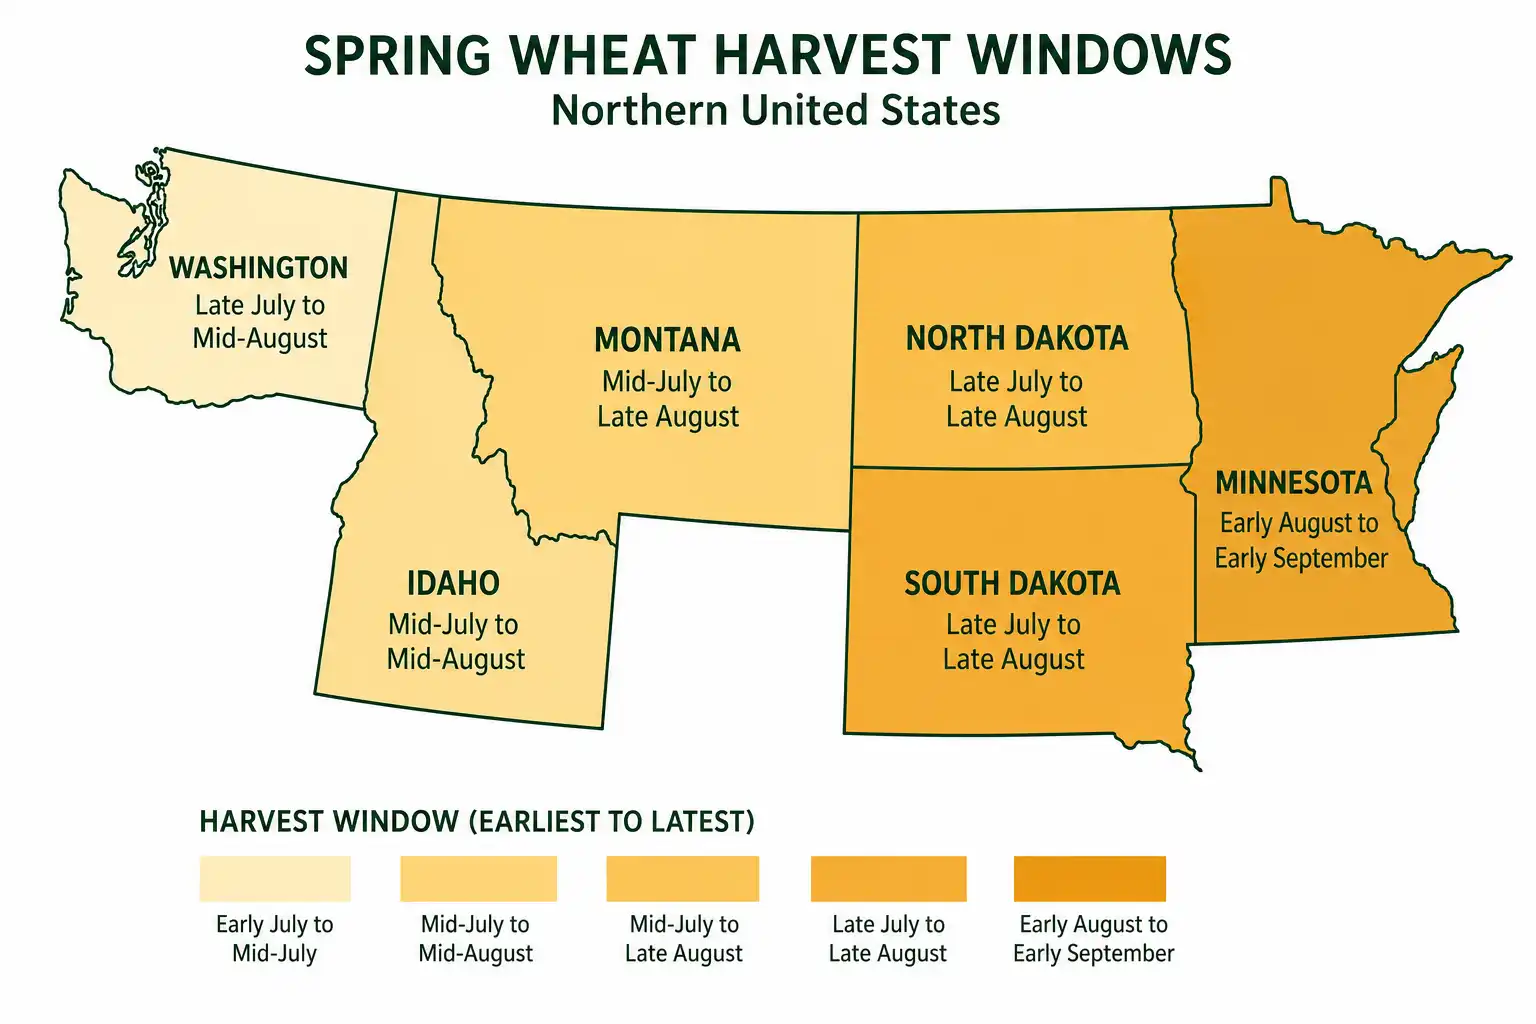
North Dakota alone grows better than half the US spring wheat crop, so its progress drives the national number. Latitude and elevation shift these dates by a week or two either way.
Harvest dates trace straight back to seeding. So spring wheat seeding dates shape your combine calendar more than anything else.
How Many Days From Planting to Spring Wheat Harvest?
Spring wheat needs 90 to 120 days from planting to harvest. Early maturing varieties finish near 90 days, while cool wet seasons stretch the crop past 110.
Heat is the variable that moves the date most. South Dakota State University tells growers to seed in the first three weeks of April. That way grain fill lands before the mid July heat. Plant after May 10 and you push flowering into hot weather, which shortens fill and drops test weight.
Splitting acres across two or three maturities spreads your harvest out. That also lowers your exposure to Fusarium head blight, since not every field flowers during the same wet stretch.
Early varieties buy you options after harvest too. Growers who follow with winter wheat need the crop off in time. Across the northern Plains, the winter wheat seeding window opens in early September.
What Happens If You Cut Spring Wheat Too Early?
Cutting before hard dough costs yield, test weight, and grade all at once. NDSU work in spring wheat and durum measured that cost. Terminating the crop at 45% moisture pulled test weight down 1 to 2 pounds per bushel. Yield fell roughly 10%.
The damage scales with how early you go. Cut at soft dough and you deliver green kernels, thin seed, and a load your buyer discounts twice.
Wet grain also moves the cost onto your dryer. Grain above 18% needs real airflow. Push heat too hard and you over-dry the bottom of the bin while the top stays tough.
There is no protein upside to jumping early either. Once the crop passes physiological maturity, no management practice raises protein. Grain fill has already closed out.
What Happens If You Wait Too Long to Harvest?
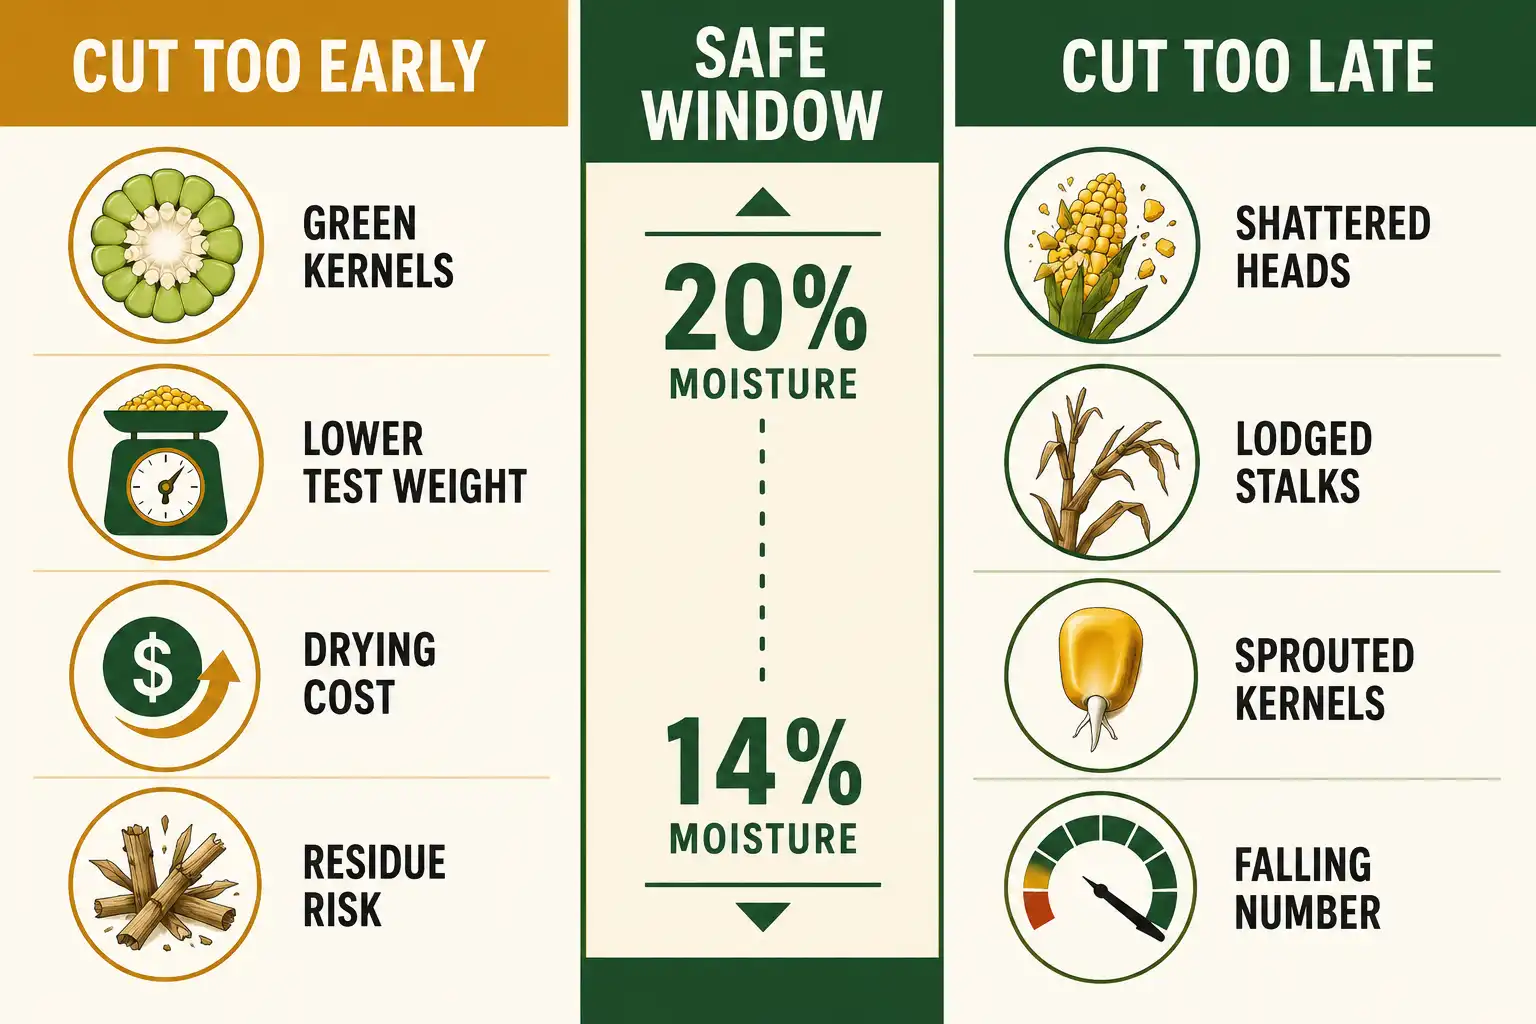
Late harvest costs test weight, falling number, and standability. Every time ripe grain takes rain or heavy dew, test weight steps down again. Those points do not come back.
Standing wheat past ripe also brings mechanical losses. Heads shatter on the cutterbar and stalks lodge in wind. Green weeds also grow up through the canopy and slow your ground speed.
Grade standards make the cost concrete. US Number 1 wheat needs 58 pounds per bushel test weight. The Dark Northern Spring subclass also needs better than 75% dark hard vitreous kernels. A few wet weeks can drop a crop out of both.
Then there is the dry side of the problem. Below 14% moisture the cylinder cracks kernels during threshing. Waiting for the field to reach 12% trades sprout risk for cracked grain.
How Does Pre-Harvest Sprouting Affect Your Harvest Date?
Sprout risk is the reason to cut wet rather than wait for a perfect field drydown. Pre-harvest sprouting starts after physiological maturity, when cool rainy weather sits on ripe grain. The kernel then begins germinating right in the head.
Buyers measure the damage with the falling number test. A reading of 300 seconds or better means sound grain. Between 200 and 300 seconds you have some sprouting, and under 200 seconds the grain is badly sprouted. Once damaged kernels pass 4%, the load stops qualifying for food use. Sprouted wheat can lose 20% to 50% of its value.
Hard red spring wheat resists sprouting better than white wheat. Still, several rainy days in a row overwhelm even good varieties. Montana State University publishes sprout ratings by cultivar, so variety choice is a harvest decision you make back in April.
Cold or heat shock 26 to 30 days after pollination can also trigger late maturity alpha-amylase. That drops falling number without any visible sprout. Either way, keep suspect grain in its own bin. Blending low and high falling number wheat does not fix the average.
Should You Swath or Straight Cut Spring Wheat?
Straight cutting is the default, and swathing earns its place only in uneven, weedy, or lodged fields. Swathing evens out drydown and moves your harvest date up several days.
Timing decides whether swathing helps or hurts. NDSU research showed that swathing at 45% moisture cost 1 to 2 pounds of test weight. Yield fell about 10%. Cutting just before physiological maturity did not hurt yield or quality, so wait until the crop is close to 30%.
Swathing after maturity carries a different risk. Shattering climbs, but grain quality holds. Run the swather in the early morning or late evening when dew softens the heads, and you cut those losses.
The tradeoff sits in the weather. Grain lying in a swath sprouts faster than standing grain if rain delays threshing. Skip swathing entirely when you plan a pre-harvest glyphosate pass, since the two practices work against each other.
When Can You Spray Pre-Harvest Glyphosate on Spring Wheat?
Spray only after the least mature part of the field drops below 30% grain moisture. That stage is hard dough, and the thumbnail test confirms it faster than anything else.
Spraying earlier creates two problems. Yield, test weight, and end-use quality all slip. Glyphosate residue can also climb past maximum residue limits, putting export loads at risk.
Follow the label on interval as well. Most pre-harvest glyphosate labels require a minimum of 7 days before harvest. Under hot dry weather you can combine at 7 days. Cooler conditions call for closer to 14 days, especially for perennial weed control.
A few limits are worth writing on the sprayer. Labels register glyphosate for weed control ahead of harvest, not as a desiccant. Do not keep treated grain for seed unless a germination test comes back clean. Check your contract too, because some millers restrict pre-harvest applications.
How Do You Check Harvest Loss While You Cut?
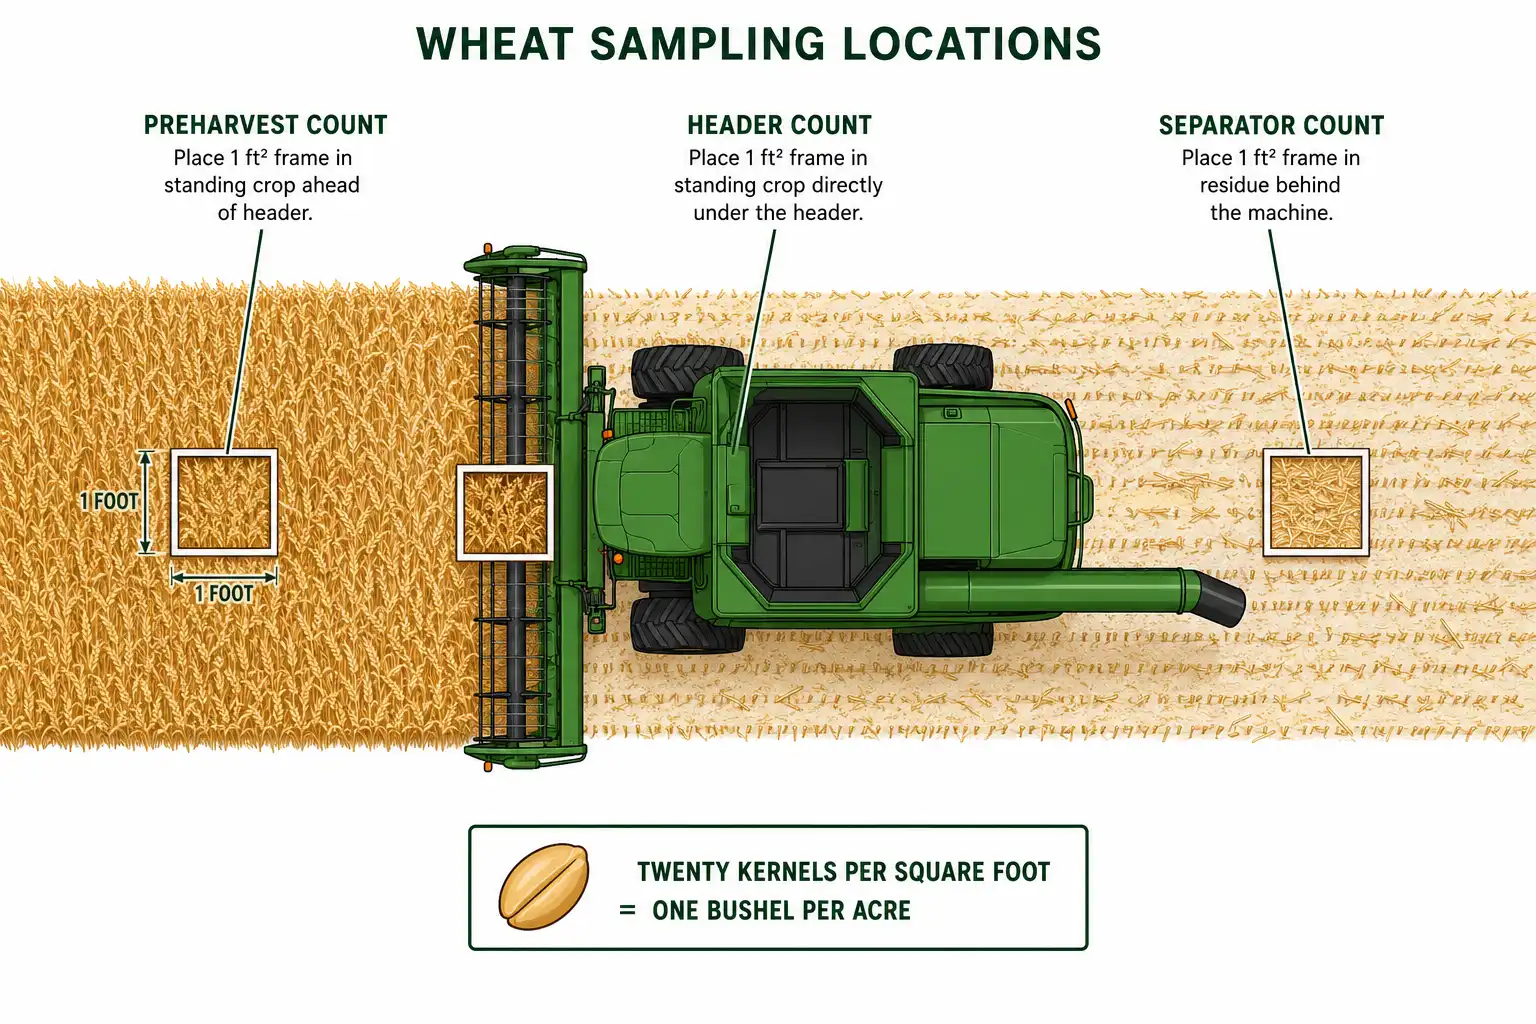
Stop the combine, back up 20 feet, shut it off, and count kernels inside a one-foot square. Twenty wheat kernels per square foot equals about one bushel per acre.
Run the count in three places to separate the sources:
- Preharvest count. Count kernels in standing wheat ahead of the header. These were already on the ground.
- Header count. Count between the standing crop and the header. Subtract the preharvest count, then divide by 20 for header loss per acre.
- Separator count. Count behind the machine. Subtract the header count. Then divide by 80 with no spreader, 50 with a straw chopper, or 25 with a chopper and chaff spreader.
Aim to hold total loss under 2% of yield. Header loss is usually the biggest slice, and ground speed is the fastest lever you control.
Fixing it is mechanical work. Sharpen and seat cutterbar knives against the guards. Set the reel axis 8 to 12 inches ahead of the cutterbar. Keep reel fingers at least 2 inches clear. Change one setting at a time, then recount.
What Moisture Does Spring Wheat Need for Safe Storage?
Store spring wheat at 14% or below for up to nine months, and at 13% for anything longer. NDSU sets those limits, and they hold whether you own a dryer or run natural air.
Natural air drying has a ceiling. Wheat up to 18% dries with 1 cubic foot per minute per bushel of airflow. At 17%, plan on at least 0.75 cfm per bushel. Start fans once average outside air reaches roughly 50°F, then run them continuously until the whole bin is dry.
Fan heat alone does more than growers expect. Air warms 4 to 5 degrees passing through the fan. That drops relative humidity about 10 points and pulls wheat to near 13.5%. Add supplemental heat only when average humidity runs above 70%.
Two practical limits matter here. Keep the bin under nine feet of grain while air drying. Also prepare bins at least two weeks ahead of harvest. Wheat draws more insect pressure than any other grain in storage. So clean, cool bins and solid grain storage methods protect the sample you worked for.
Key to Spring Wheat Harvest Timing
Four numbers cover most of this. Physiological maturity lands near 30%, and cutting starts at 20%. Threshing damage begins below 14%, while the bin wants 13.5% or drier.
Watch the forecast harder than the calendar. If ripe wheat sits at 18% to 20% and rain is coming, roll the combine and dry the grain. Test weight and falling number pay you back far more than the fuel you burn in the dryer.