Soil Sampling Tools 2026: 12 Essentials for Accurate Test Results
Are you looking for soil sampling tools that pull a clean, consistent slice of ground for a lab soil test? These tools collect soil at a set depth so your fertility, contamination, or construction decisions rest on solid data.
This guide covers the common tool types, how to pick one for your soil and target depth, and a start-to-finish sampling workflow with safety, care tips, and mistakes to avoid. You will also see where a soil probe or soil auger fits, plus how to protect composite sample quality and sample depth consistency.
What are soil sampling tools and what do they do?
Soil sampling tools are hand or powered devices that remove soil at a defined sampling depth so a lab can run soil analysis and give actionable recommendations.
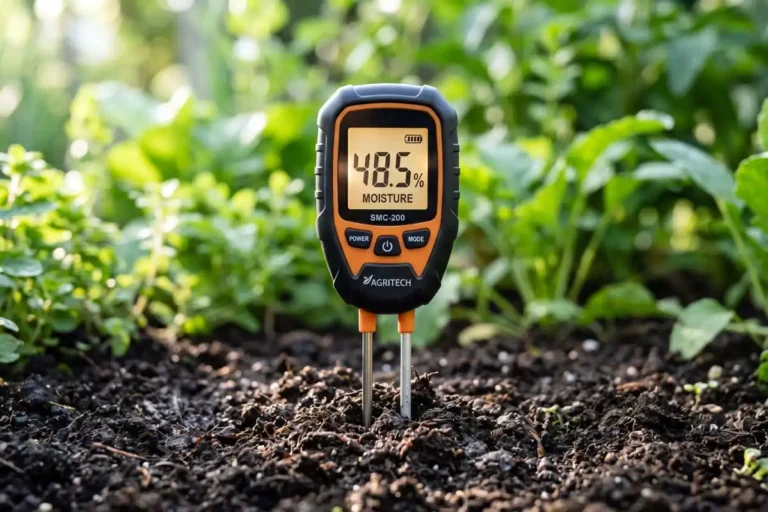
The tool affects sample integrity, depth consistency, and contamination risk, so soil testing accuracy can swing if your method changes mid-field.
A clean, repeatable cut produces a more representative sample for nutrients, pH, and investigations for VOCs/contaminants. You don’t need fancy gear, but you do need consistency in soil sampling and handling.
What are the best soil sampling tools?
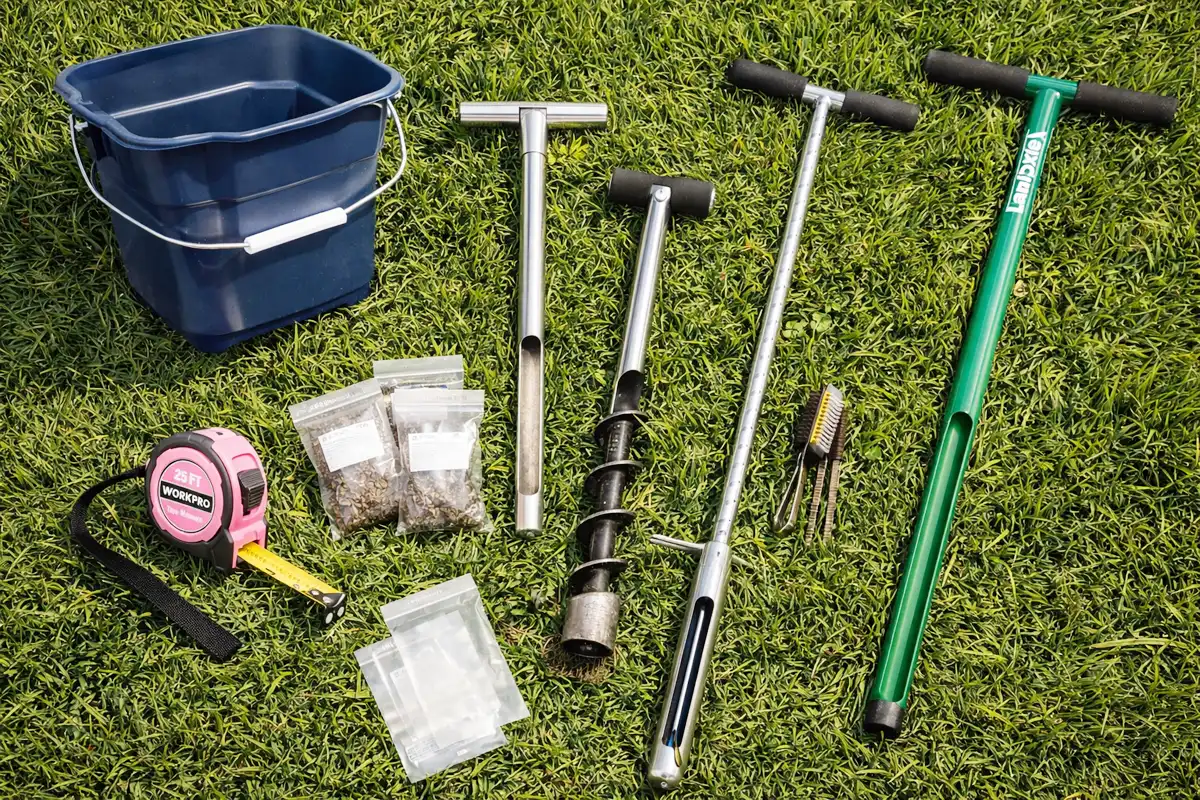
Reliable soil sampling tools include a soil probe or auger, clean sample bags, a mixing bucket, and clear labels. Here are solid options:
- LANDZIE 20 inch Soil Probe, T-Handle (12″ Sampling Depth)
- AUZEKER 40″ Stainless Soil Sampler Probe with T-Handle
- Sleekspace 12″ Soil Probe + Small Sampler Bags (T-Handle)
- Varomorus 12″ Stainless Soil Sampler Probe (T-Style Handle)
- HiHydro 12″ Stainless Soil Probe + 2 Sample Bags (T-Handle)
- Rubbermaid Roughneck 15-Quart Square Bucket (Sturdy Pour Handle)
- GPI 4″ x 6″ Zip Bags (100 Pack, 4 Mil, Write-On Label Block)
- Seymour AUA2 Adjustable Manual Auger with Wood Handle
- VNIMTI Spade Shovel Transplanting Spade
- Whirl-Pak 6″ x 15″ (42 oz) Sampling Bags, 3 mil
- Flexible Cleaning Brush Set for Probes/Rods (Multi-Size)
- WORKPRO 25FT Tape Measure
Types of Soil Sampling Tools
Each farm soil sampling tool type targets a different balance of depth control, disturbance, speed, and the kind of “core” you need for your goal.
Soil probes (core-style probes for consistent depths)
A probe is a narrow tube that pulls a uniform plug, which makes routine sampling fast and repeatable. Many farm and turf programs focus on common topsoil depths like 0–6 inch or 0–8 inch depth guidance, and probes excel there when you keep the tool straight and stop at the same mark.
A soil probe shines in fields, lawns, and garden beds where you want a consistent soil core across many stops. Probes struggle in rocky ground, dry hardpan, and heavy compaction where the tube deflects or refuses to bite.
Soil augers (bucket/spiral/hollow-stem concepts)
Augers bore a hole by twisting, then bring soil up as a disturbed sample from deeper layers. They work well when you need a deeper profile, mixed textures, or tighter access than a shovel allows.
Common styles include soil auger types like a bucket auger (holds loose soil), a spiral auger (moves soil up the flights), and a hollow stem auger used in borehole work for investigations. Augers handle more depth options than probes, but they disturb structure and can smear wet clay.
Tube/core samplers (more “undisturbed” samples)
Tube samplers aim to preserve layers and structure, which matters in geotechnical, moisture, and some environmental sampling.
Tools like a tube sampler, split tube sampler, or Shelby tube collect an undisturbed core that keeps stratification and can help with work where VOC handling and minimal disturbance matter. These farm soil sampling tools often need steadier technique and soils that allow a tube to advance without collapsing or gravel tearing the sample.
Shovel/spade sampling (budget-friendly but technique-sensitive)
Spade sampling works when you do it the same way every time. Cut a V-shaped hole, then shave a thin slice from one side, and take the center strip for your sample.
This “spade method” or shovel sampling fits home gardens and basic fertility checks when a probe is not available. The risk is inconsistent depth and volume if you rush, which can skew results across a zone.
Accessories
Accessories often decide whether your results stay trustworthy.
- A clean bucket made of plastic for mixing subsamples into a composite
- Sample bags and permanent marker labels
- Extensions, T-handle, and rods for reach and leverage
- Quick-connect adapters, pins, and spare clips
- Brushes and cleaning tools for the cutting edge and tube
- Gloves, eye protection, and sturdy footwear
Anything that touches soil stays clean, or it becomes a contamination source.
Top 5 Core Soil Sampling Tools
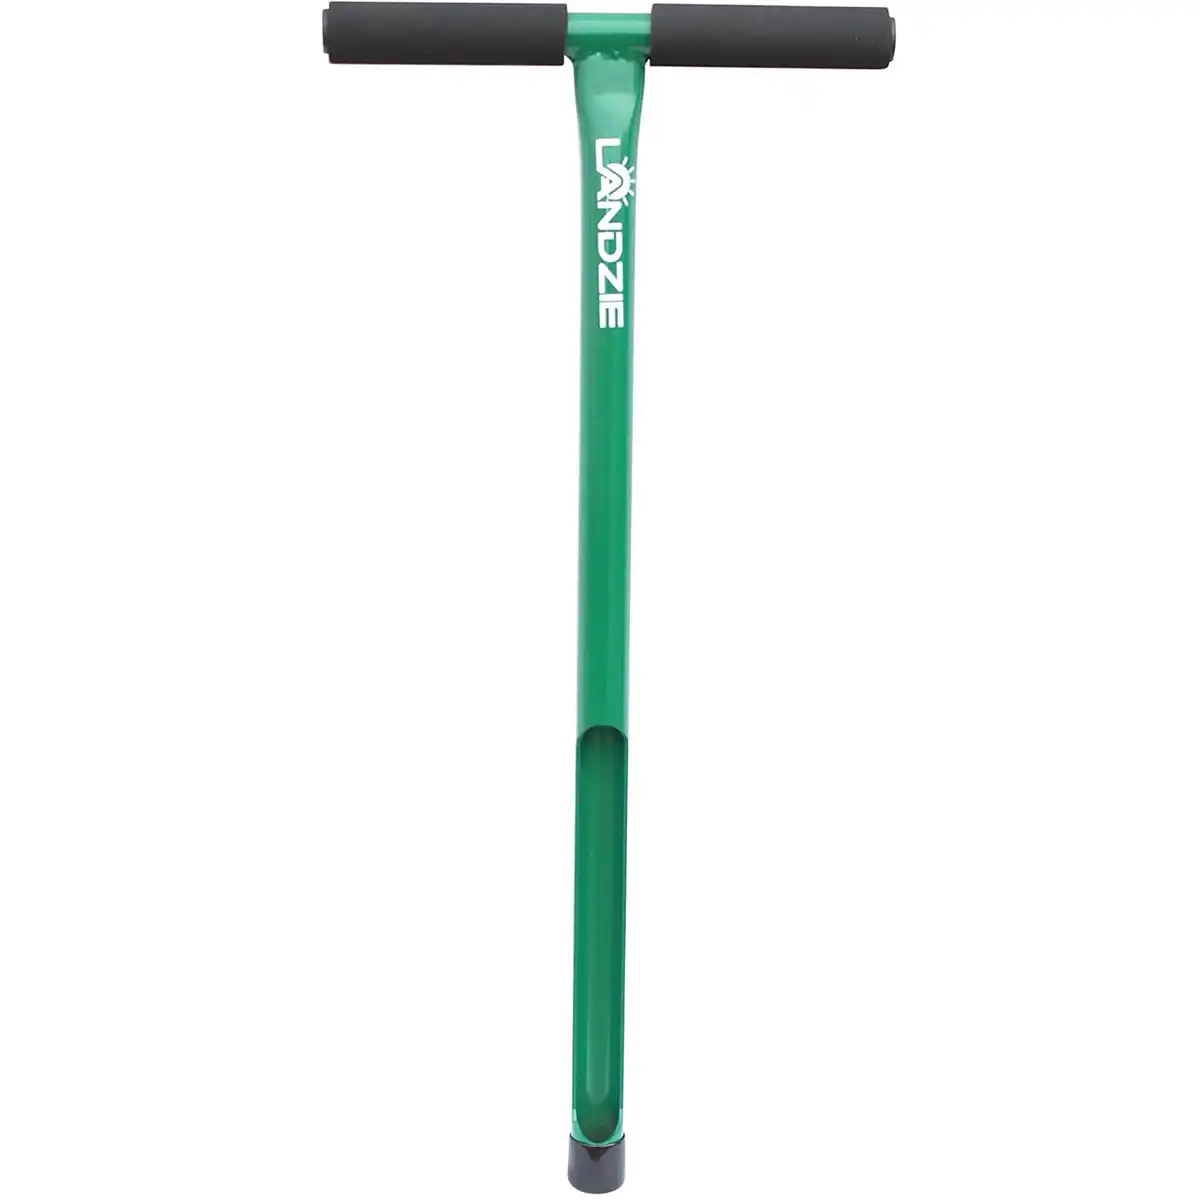
This probe fits homeowners and turf folks who want repeatable cores without tearing up a lawn.
The beveled opening and foam grip support quick sampling, and Landzie states it pulls full 9-inch cores while the tool reaches 20 inches overall. The honest limitation: it’s a manual steel probe, so very rocky or baked-hard soils slow you down.
Specifications
- Length: 20 inches
- Core length: 9 inches (stated)
- Material: steel (powder-coated finish stated)
- Weight: 2 lb
- Power: manual
Pros
- Comfortable foam grip
- Built for consistent cores
- Powder-coated for corrosion resistance
Cons
- Manual push struggles in hard, rocky spots
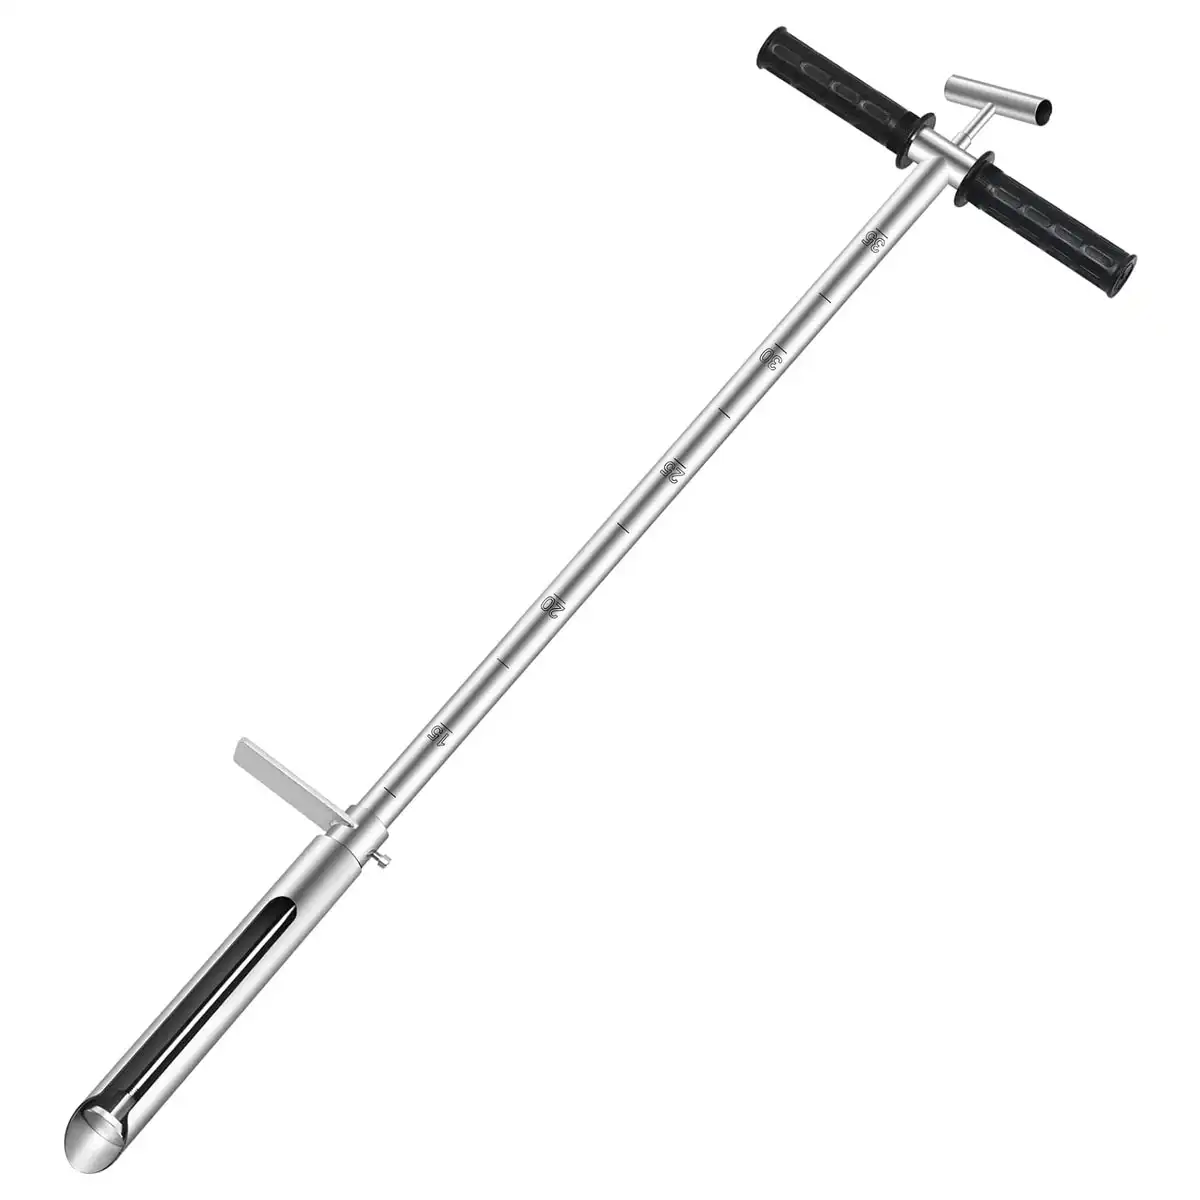
This heavy-duty probe suits anyone who wants deeper sampling without switching to an auger
The stainless build resists corrosion, and the anti-pinch guard is a smart touch if you sample a lot in a day. The limitation is obvious: at 6.49 lb, it’s heavier than short probes, and deep sampling takes more effort in tight or compacted ground.
Specifications
- Length: 40 inches
- Material: stainless steel
- Weight: 6.49 lb
- Handle: ergonomic T-handle with anti-pinch guard
- Size: 43 x 12 x 2.2 in
Pros
- Reaches deeper layers
- Finger-guard improves comfort
- Built for repeated use
Cons
- Heavy for long sampling runs
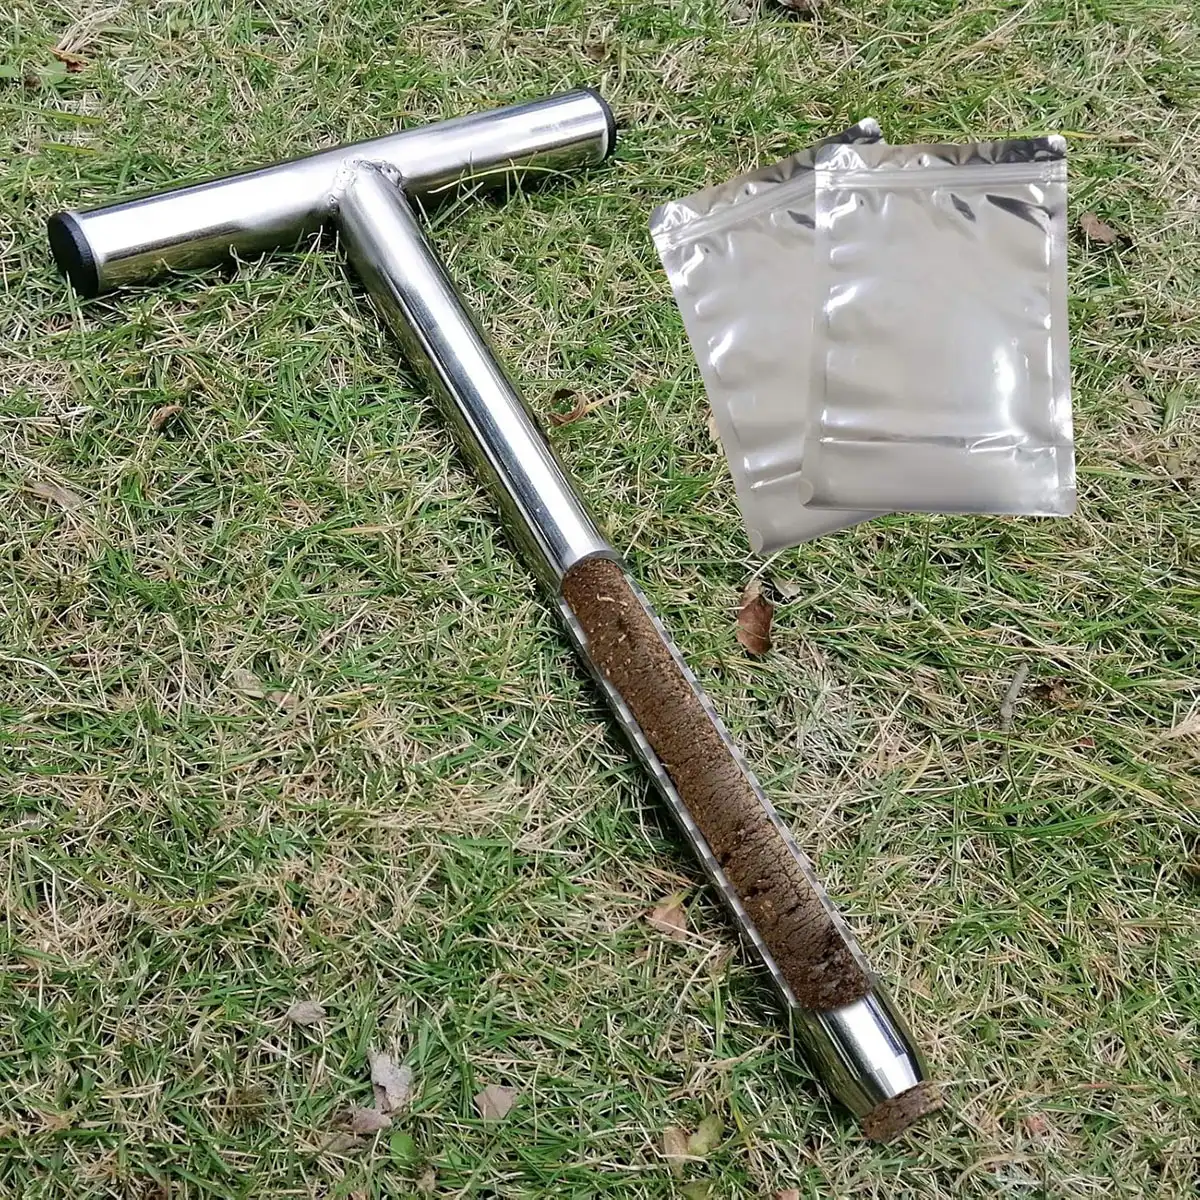
This setup fits small lawns, gardens, and quick checkups where you want tidy layers and less fuss with clogging.
Sleekspace highlights a patent-pending 1-inch tube and a shortened head aimed at reducing jams, plus EVA grips to help you twist without slipping. The limitation: it’s a 12-inch model, so it targets shallow sampling, not deeper profiles.
Specifications
- Probe length: 12 inches
- Tube width: 1 inch (stated)
- Weight: 1.11 lb
- Includes: 3 sample bags (6 x 9 in)
- Safety cap included
Pros
- Designed to reduce clogging
- Comfortable grip for twisting
- Includes bags for quick labeling
Cons
- Shallow reach for deep sampling needs
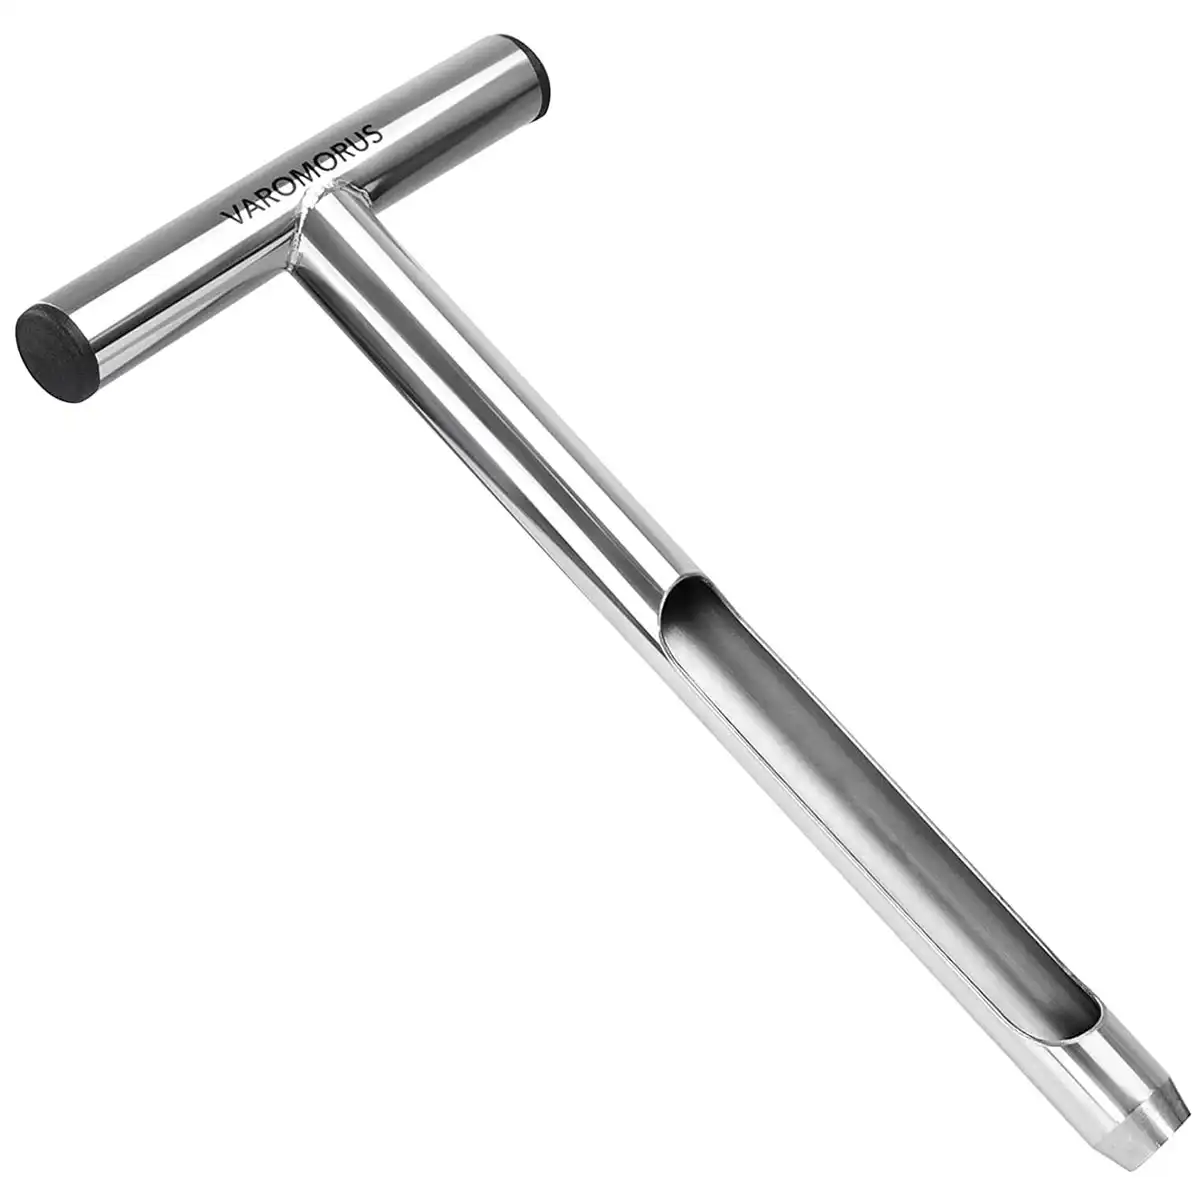
This compact probe fits spot checks around trees, lawns, and small plots where you want a simple core fast.
It’s light, uses a one-piece T-style handle, and the listing calls out a 3/4-inch-wide sampler that pulls an 8-inch-deep core. The limitation: the brand warns against sampling when the area is too dry or hardened, which is when many folks want to test.
Specifications
- Length: 12 inches
- Width: 3/4 inch (stated)
- Core depth: 8 inches (stated)
- Weight: 1 lb
- Material: stainless steel
Pros
- Easy to carry
- Simple one-piece handle
- Useful for quick moisture/soil checks
Cons
- Dry, hard ground makes sampling tougher
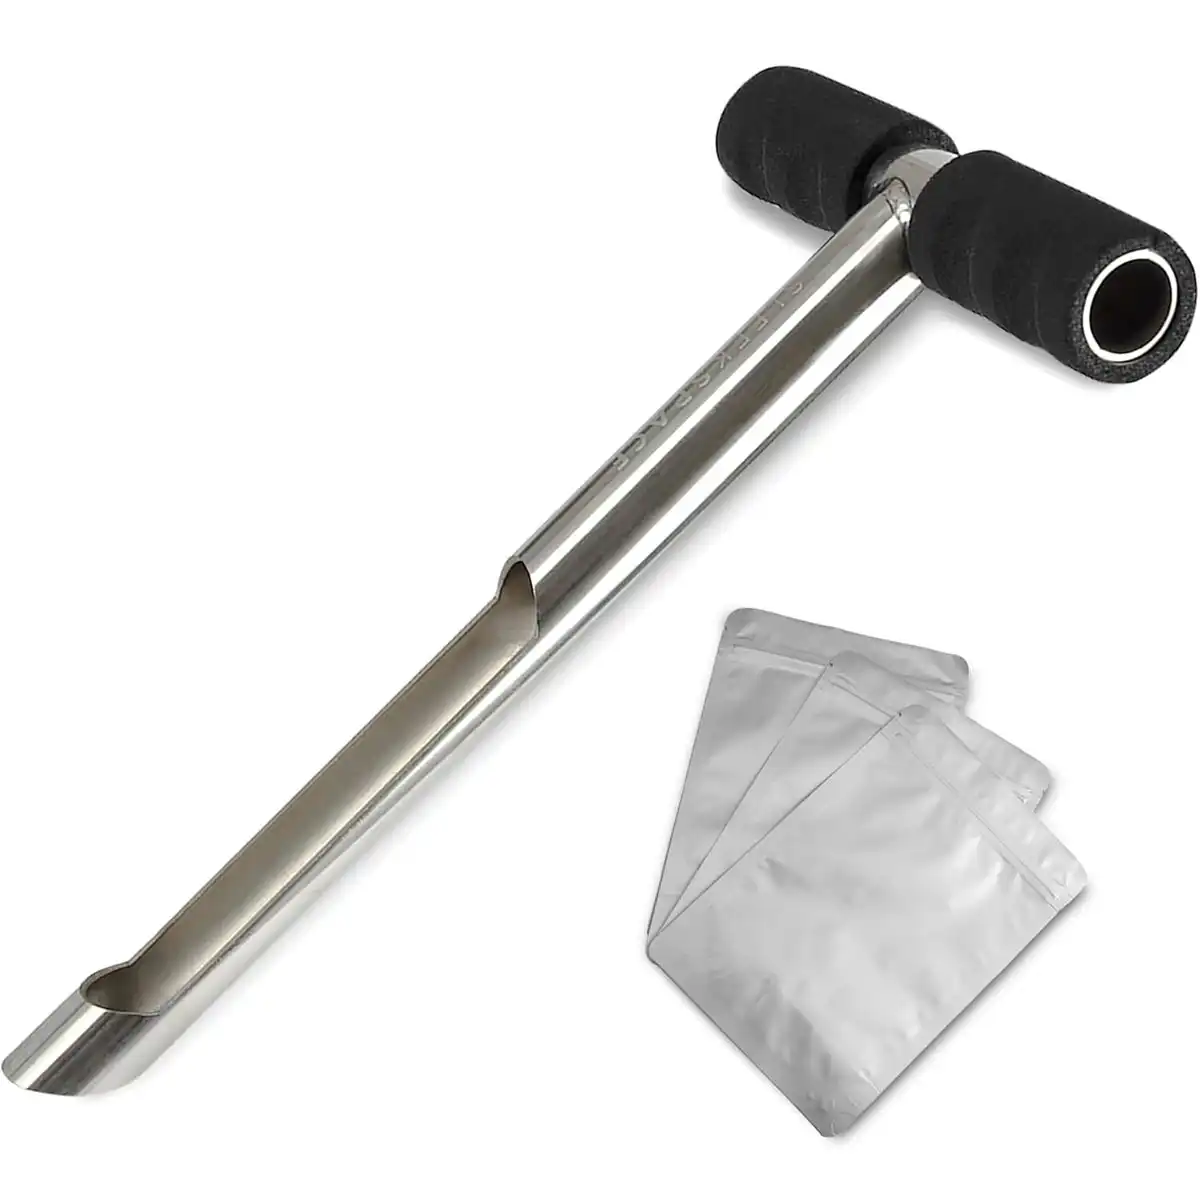
This kit fits garden, golf, and light ag sampling when you want a light probe plus bags to keep things organized.
HiHydro includes two recyclable PE bags, a chamfered edge for easier entry, and plugs on both sides of the handle to reduce hand bumps. The limitation: the listing says to avoid rubble, since that can damage the probe.
Specifications
- Length: 12 inches
- Outer diameter: 0.98 (stated)
- Handle length: 10 inches
- Weight: 15.2 oz
- Includes: 2 PE bags
Pros
- Lightweight for lots of stops
- Depth marking intervals noted
- Includes reusable bags
Cons
- Not suited to rubble-heavy soils
Soil Sampling Essentials (Mixing, Bagging & Labeling)
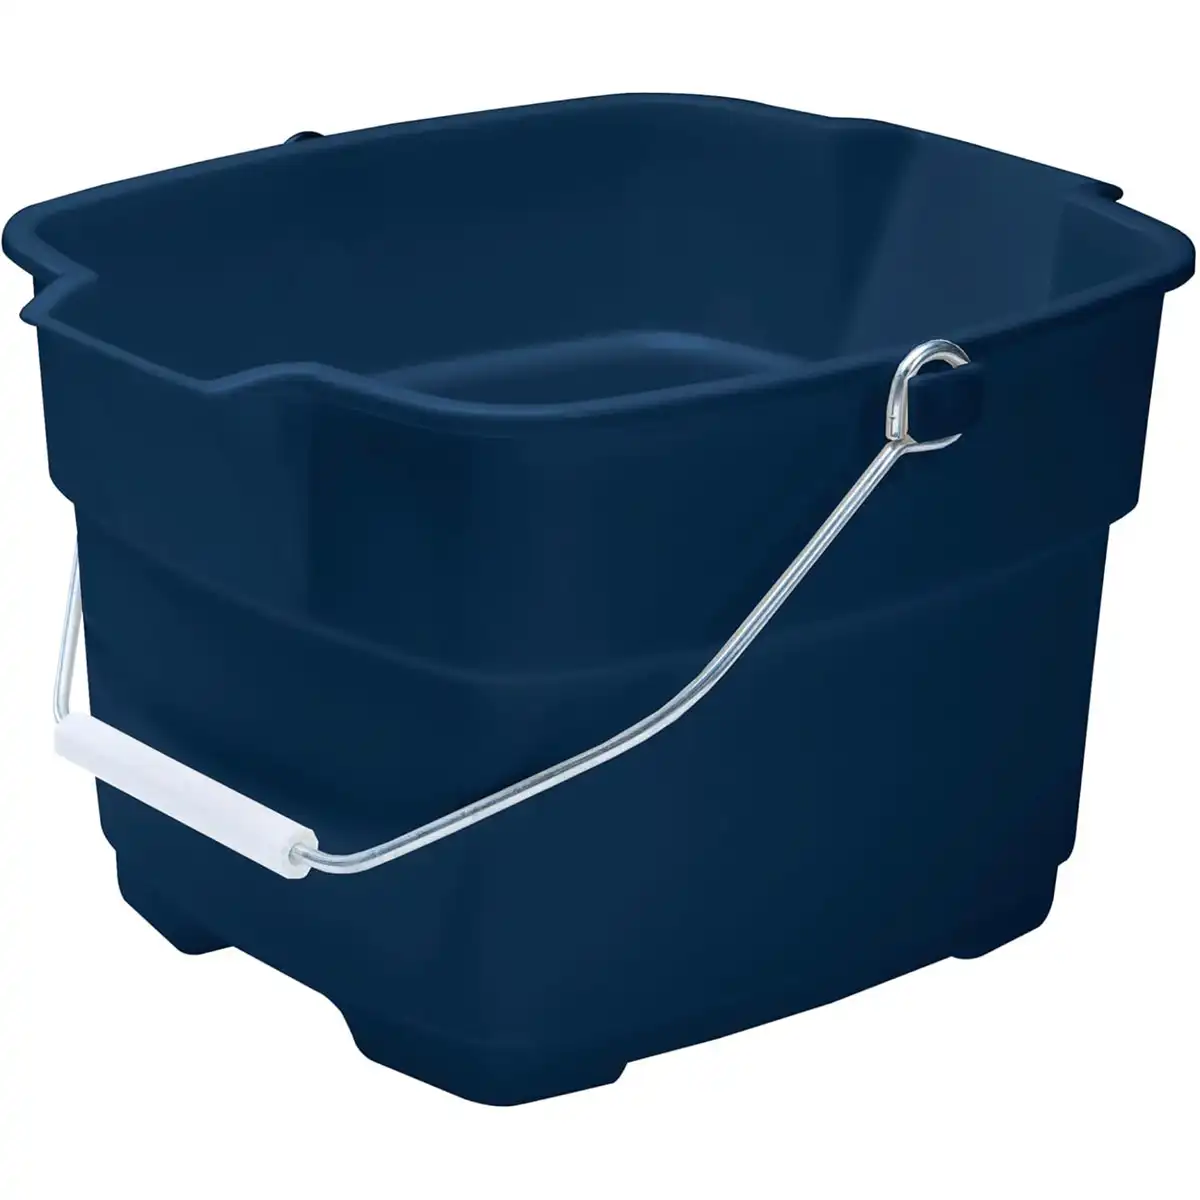
A clean mixing bucket protects your lab numbers more than most folks realize, and this one is built for rough handling.
The heavy wire bail adds durability, and the twin pour spouts make it easier to empty without dumping soil everywhere. The limitation: it has no lid, so you still need good bags and labels for storage and transport.
Specifications
- Capacity: 14 quarts
- Shape: square
- Weight: 1.4 lb
- Dimensions: 14.5 x 11 x 9.2 in
- Features: heavy wire bail, twin spouts
Pros
- Durable handle design
- Easy pouring from either side
- Plenty of room for mixing composites
Cons
- No lid for sealed transport
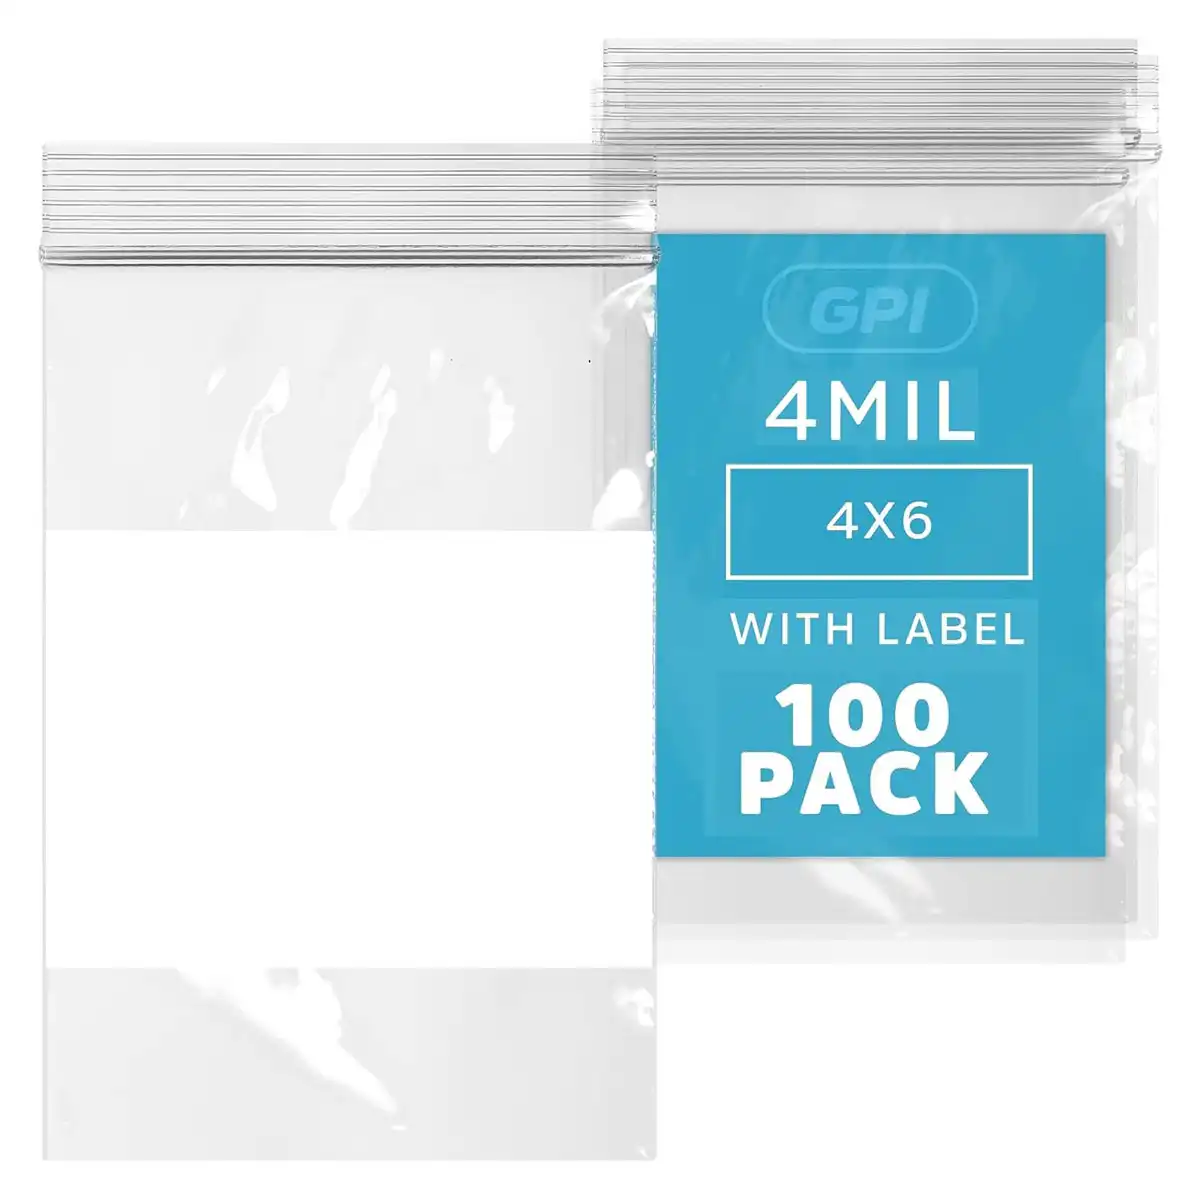
These bags fit routine soil testing where you want a quick seal and clear labeling.
The write-on white block saves time in the field, and the 4 mil thickness holds up better than thin snack bags. The limitation: 4″ x 6″ is a small size, so it works best for the typical lab subsample, not bulky, wet soil.
Specifications
- Size: 4 x 6 inches
- Thickness: 4 mil
- Quantity: 100 bags
- Closure: zipper lock
- Feature: write-on label block
Pros
- Easy labeling in the field
- Stronger 4 mil plastic
- Airtight, dustproof seal (stated)
Cons
- Small capacity for wet/heavy samples
Recommended Add-Ons for Soil Sample (Depth, Cleaning & Hard-Soil Sampling)
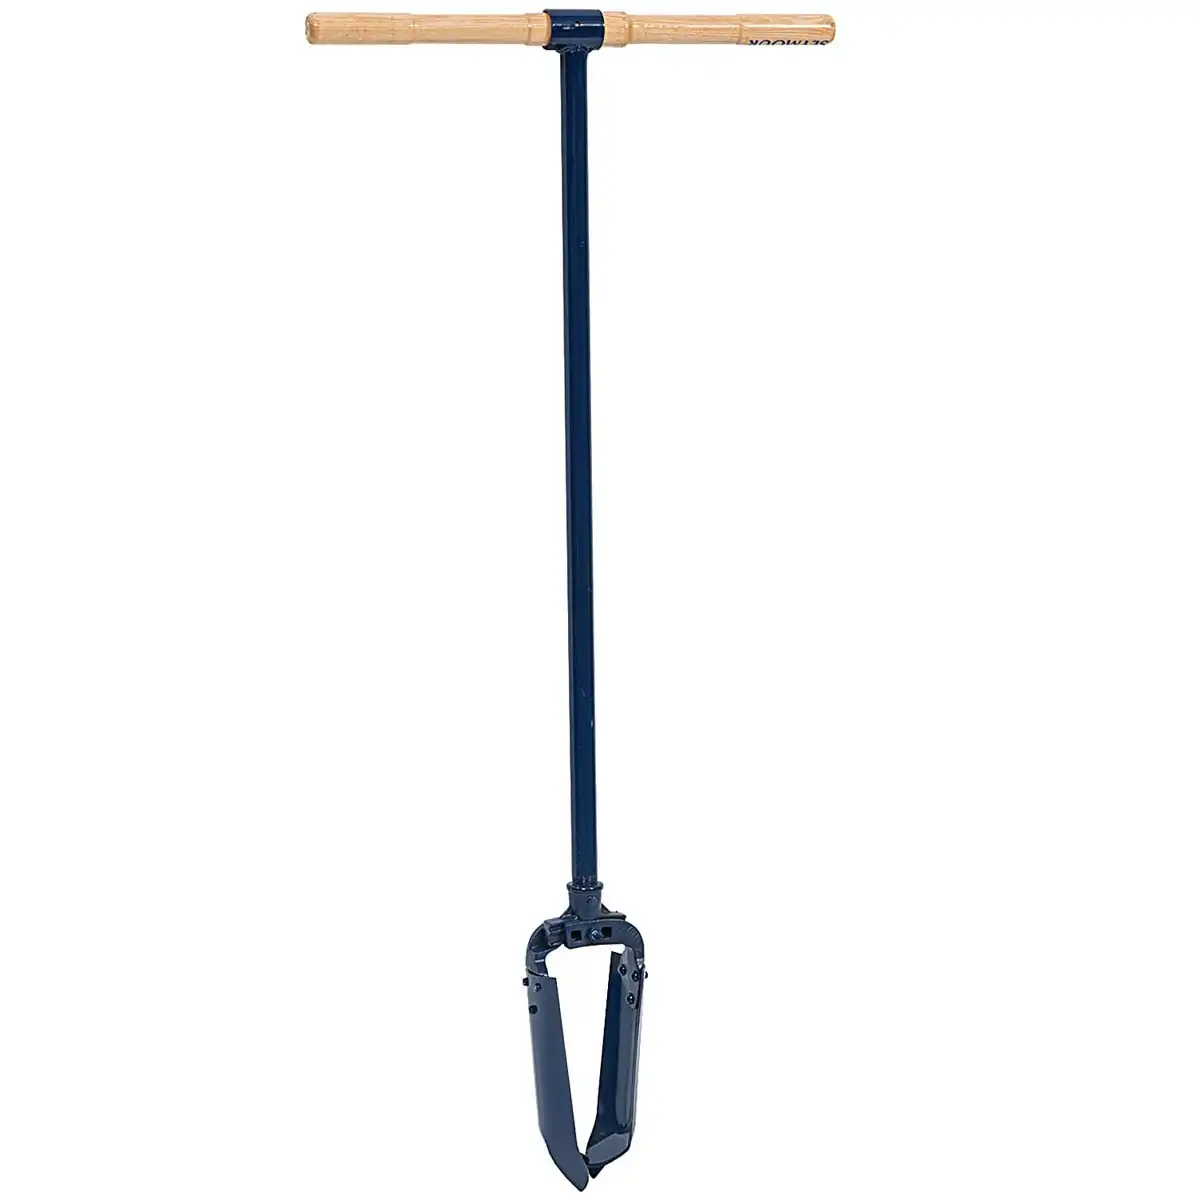
This auger fits jobs where you need a larger hole in mixed soils, like posts or access holes before you collect a separate sample
The adjustable yoke lets it bore 6-, 7-, or 8-inch holes, and the hard-maple cross handle gives leverage. The limitation: this is not a precision core sampler, so it’s better as a digging add-on than a direct “send-to-lab” tool.
Specifications
- Boring sizes: 6, 7, 8 inches
- Height: about 46.5 inches (stated)
- Weight: 7.48 lb
- Handle: 21-inch cross handle (stated)
- Build: steel blades, adjustable yoke
Pros
- Adjustable hole sizes
- Strong leverage handle
- Built for varied soils
Cons
- Not designed for clean soil cores

This shovel fits gardeners who use the V-hole slice method and want a narrow blade that slips into tight spots.
The long, narrow spade is designed to cut a plug without tearing up nearby plants, and the D-handle plus foot plates improve control. The limitation: depth consistency depends on your technique, so mark your target depth and stay disciplined.
Specifications
- Length: 45 inches
- Weight: 3 lb
- Blade: alloy steel, narrow profile
- Handle: wood with D-grip
- Features: foot plates for pressure
Pros
- Good control in tight spaces
- Penetrates clay-like or hard soil (stated)
- Lightweight for most users
Cons
- Depth uniformity relies on operator skill
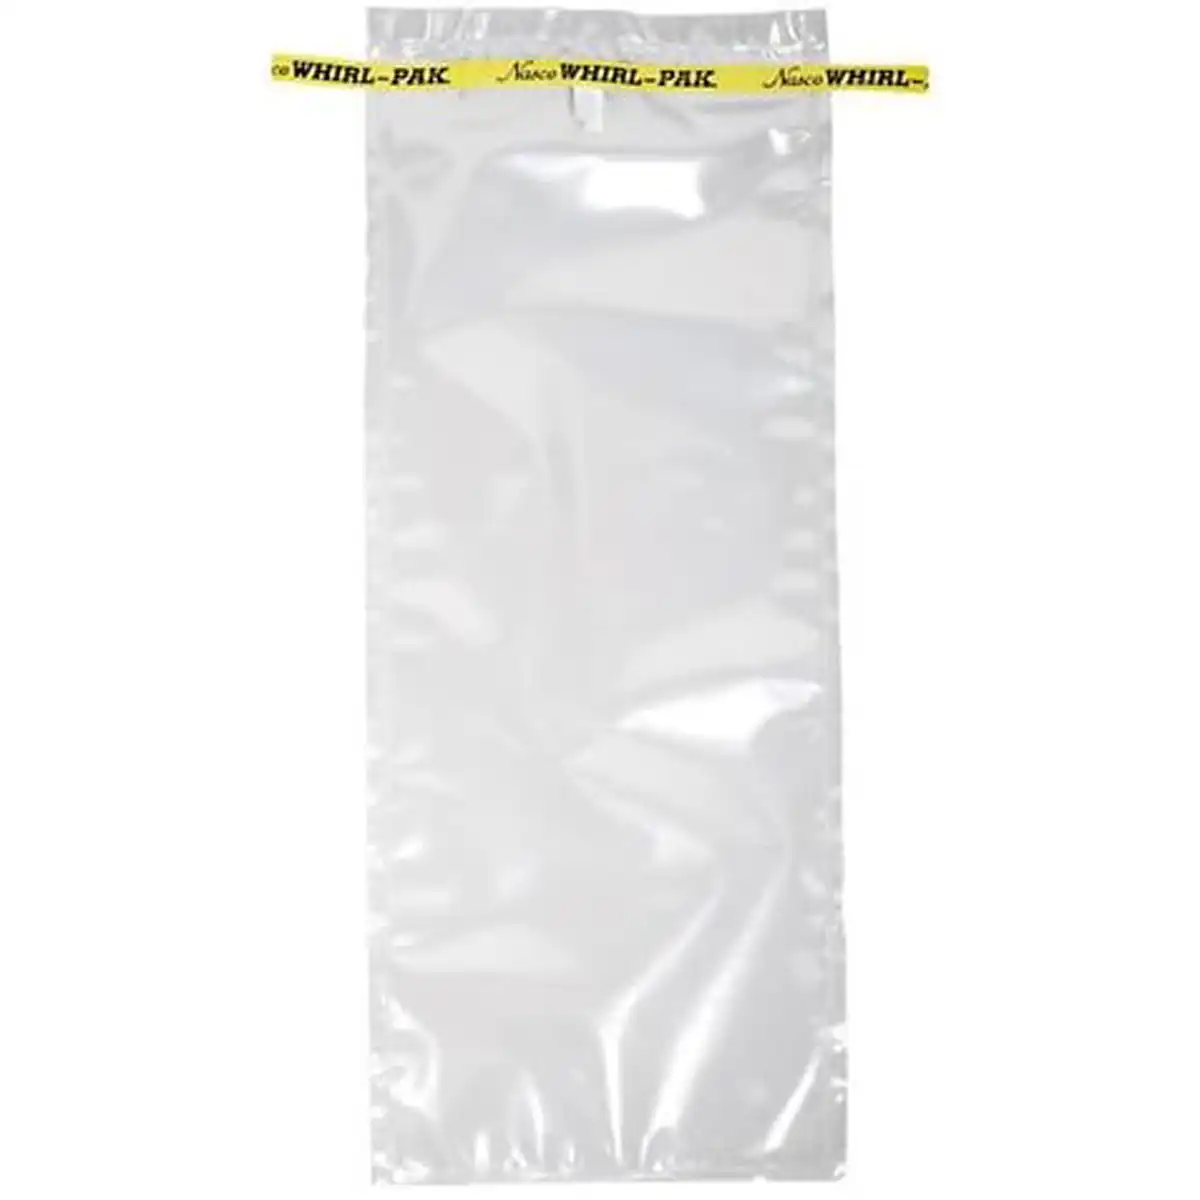
These bags fit sampling where you want a tighter seal than a zip bag, especially if the sample is damp.
The wire closure and tape system holds the bag open while you fill, then locks down when you whirl and bend the tabs. The limitation: sealing takes a few extra seconds per bag compared to a zipper, so it’s slower for high-volume sampling days.
Specifications
- Size: 6 x 15 inches
- Thickness: 3 mil
- Capacity: 42 oz (stated)
- Closure: wire/tape system
- Notes: material meets USDA/FDA standards (stated)
Pros
- Strong, moisture-friendly seal
- Stays open while filling
- Good for solids or liquids (stated)
Cons
- Slower sealing than zip bags
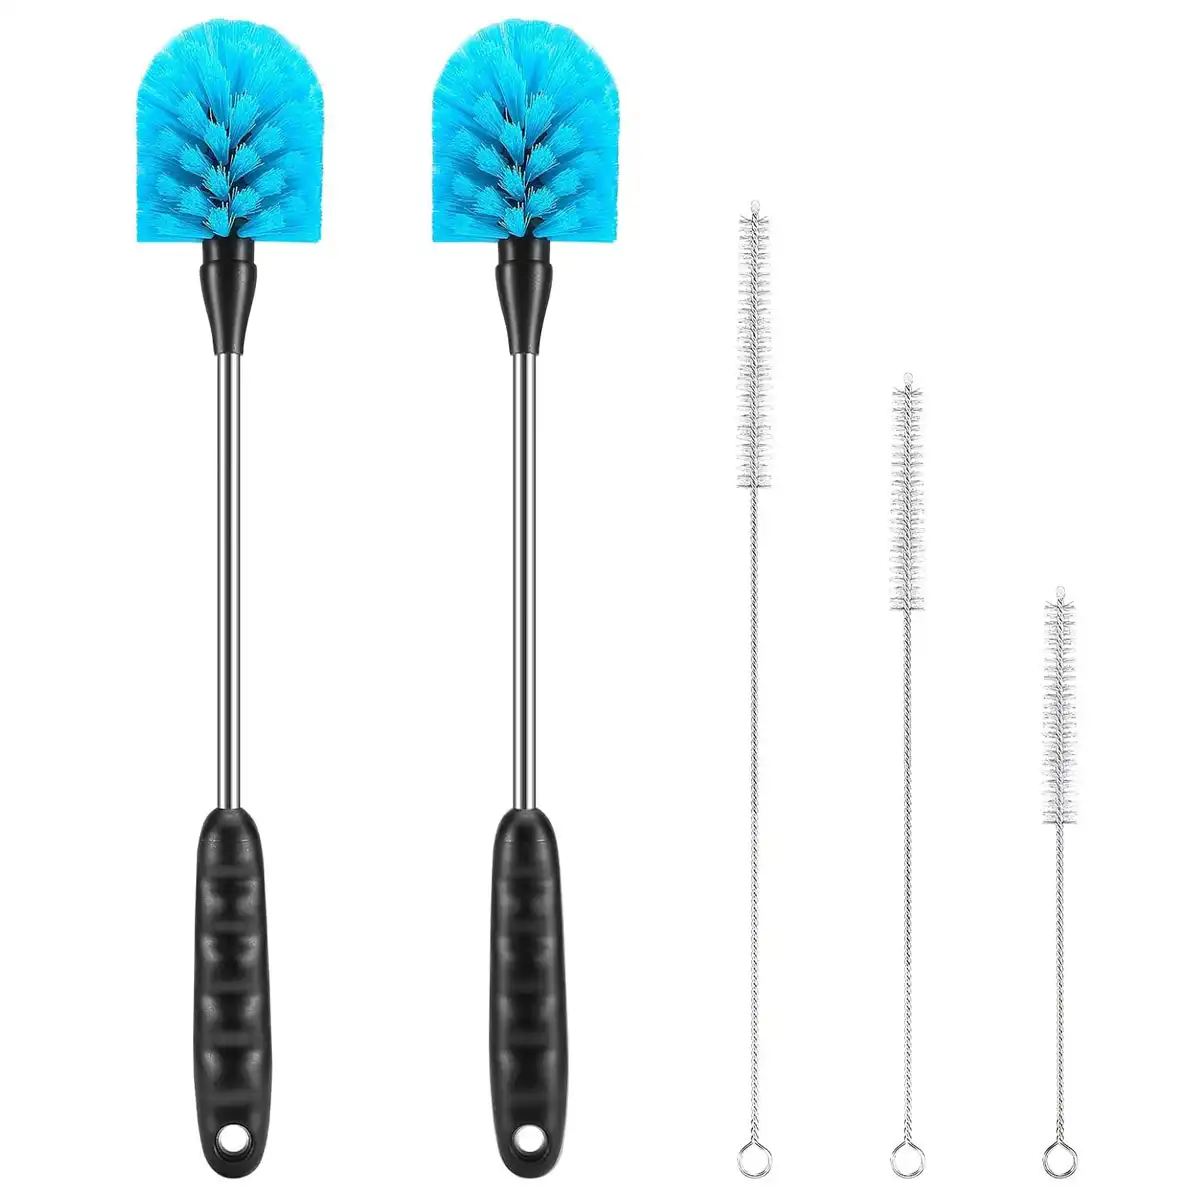
This brush set fits anyone tired of fighting dried soil inside tubes and probe slots.
It includes a 14-inch long-handle brush plus smaller straw-style brushes, and the non-slip rubber handle helps you scrub without slipping. The limitation: it’s a cleaning kit, not a disinfecting system, so you still need the right rinse and disinfectant routine for cross-field hygiene.
Specifications
- Set size: 5 brushes (stated)
- Long brush length: 14 inches
- Includes straw brushes: 7.9, 9.8, 11.8 inches (stated)
- Handle: non-slip rubber
- Storage: hanging holes/loops
Pros
- Reaches inside narrow tubes
- Easy to hang and dry
- Soft heads help avoid scratches (stated)
Cons
- You still need a disinfecting step when required

A tape measure improves sampling consistency when you map zones, space sampling points, or set repeatable plot boundaries.
This one uses a 1-inch wide blade, a magnetic hook, and a thumb lock so you can measure without the tape snapping back. The limitation: it’s an add-on tool, so it won’t replace good sampling technique, clean tools, and proper labeling.
Specifications
- Length: 25 feet
- Accuracy: 1/32 inch (stated)
- Blade width: 1 inch
- Standout: 7.2 feet (stated)
- Features: magnetic hook, thumb lock, rubber case
Pros
- Easy-to-read markings (stated)
- Helps repeat field layouts
- Drop-resistant casing (stated)
Cons
- Not a sampler; it supports the process
Soil Probe vs Soil Auger vs Core Sampler
A soil probe collects a clean core at a consistent shallow depth for routine fertility sampling. A bucket-style auger collects disturbed soil from deeper intervals to build a soil profile.
A tube sampler targets an undisturbed core for work where structure, layers, and moisture matter, including some engineering and environmental projects. Rocky or compacted soils limit probes, wet clays can smear in augers, and hard ground can defeat tubes without the right driving method.
Soil probes
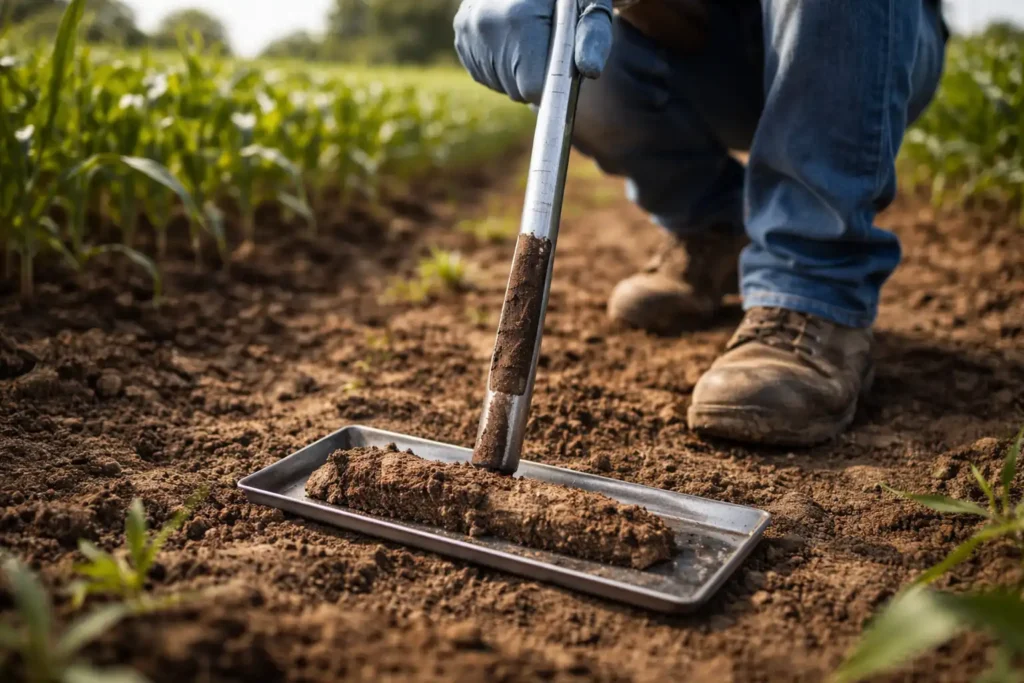
A soil probe takes quick soil core plugs at a set depth, which supports consistent routine field sampling. Mark the probe for a consistent depth and keep it perpendicular so you don’t short the core. Empty each core into the same clean container so your composite reflects the whole zone.
Soil augers (hand augers, bucket augers, gouge augers)
A soil auger twists into the ground to reach deeper layers than most probes. A hand auger works for small jobs, a bucket auger holds loose material better, and a gouge auger helps in some sticky soils and sampling intervals. The basic workflow stays the same: twist to depth, pull straight out, transfer soil carefully, and repeat at the next point without mixing depths.
Core/tube samplers for undisturbed samples
A core sampler or tube sampler drives a tube into soil to preserve layers and soil structure. This approach fits lab or engineering needs that depend on natural arrangement and moisture. It takes steadier handling and does not suit gravel, very hard ground, or shallow bedrock without specialized gear.
How to Choose the Right Soil Sampling Tool
The right soil sample tool keeps your samples consistent, reduces contamination risk, and produces results you can compare year to year.
Choose by purpose (fertility vs. soil health vs. contamination vs. geotech)
Use this decision guide as a practical starting point:
- Routine soil fertility test and soil pH for crops and lawns: probe first
- Deeper profiling for nutrients, salts, or subsoil patterns: auger with extensions
- Agricultural structure checks, environmental investigations, or geotechnical work: tube samplers for an undisturbed sample
- Rough screening on a tight budget: shovel method with strict depth control
For liming plans, pairing consistent sampling with your lab’s recommendation timing helps, and my guide on NPK fertilizer choices makes more sense when your soil numbers are reliable.
Choose by soil condition and access
Tool choice changes with ground conditions and site limitations.
Compacted or rocky soil fights probes and can bend tips. Wet clay soil can smear, which blurs layer boundaries and makes depth intervals harder to keep clean. Dense vegetation can limit where you can swing a shovel.
For shallow subsurface work, manual driving aids like a slide hammer or probe rod jack help advance rods and tubes when hand pressure fails. If you plan deeper intervals, auger extensions add reach but demand stable footing and careful handling.
Choose by depth targets and consistency
Sampling depth stays consistent across every subsample in a zone, or your composite stops representing the field. Many labs use common topsoil depths like 6–8 inches, and they may request a separate subsoil interval such as subsoil 6–24 inches concept depending on the crop and goal.
Match your depth targets to the lab form or local extension guidance, then mark your tool so you hit the same depth every time.
If you’re comparing tillage systems, depth consistency matters even more, so keep my notes on tillage versus no-till in mind when you set zones and intervals.
Best Practices for Using Soil Sampling Tools
Good soil analysis tools help, but the method controls the result. The steps below keep sampling repeatable, clean, and useful for decision-making.
Decide sampling depth and stay consistent
Pick a depth that matches your management layer, then keep it fixed.
Turfgrass programs often focus on shallow topsoil, plowed ground often uses a deeper mixed layer, and reduced-till or no-till systems often sample a defined surface depth without blending deeper soil.
Define one sampling area or management zone at a time, avoid odd spots like fertilizer bands, old burn piles, wet pockets, and field edges, and take enough subsamples to build a true composite. The rule that holds up is: same area, same depth, many subsamples.
Use a composite sample built from multiple subsamples taken on a clear sampling pattern and at the same sampling depth across that zone, whether the zone is plowed soil, no-till, or turfgrass.
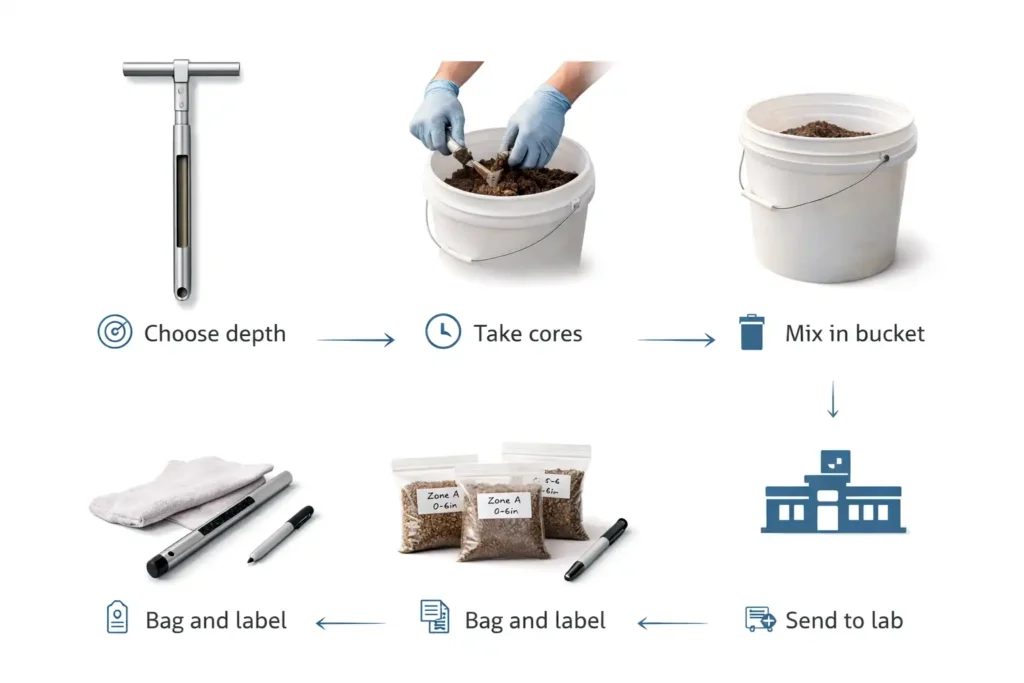
Collect cores correctly (probe / spade / auger quick steps)
Use repeatable motions and a repeatable pattern.
- Probe: push or step to the marked depth, pull straight out, then empty the core into your bucket
- Spade: cut a V-hole, take a thin slice from the side, then keep the center strip for your sample
- Auger: twist to depth, pull straight, then take soil from the target interval and keep each depth separate
Walk a zigzag pattern or W pattern through the zone so you avoid clustering points. Many guides start with “collect at least 10 cores” per area, and some operations aim closer to 25 cores for larger or more variable zones. Pick a count you can repeat every year so trends stay comparable when you track how to take a soil sample with proper technique.
Prevent contamination (cleaning and handling)
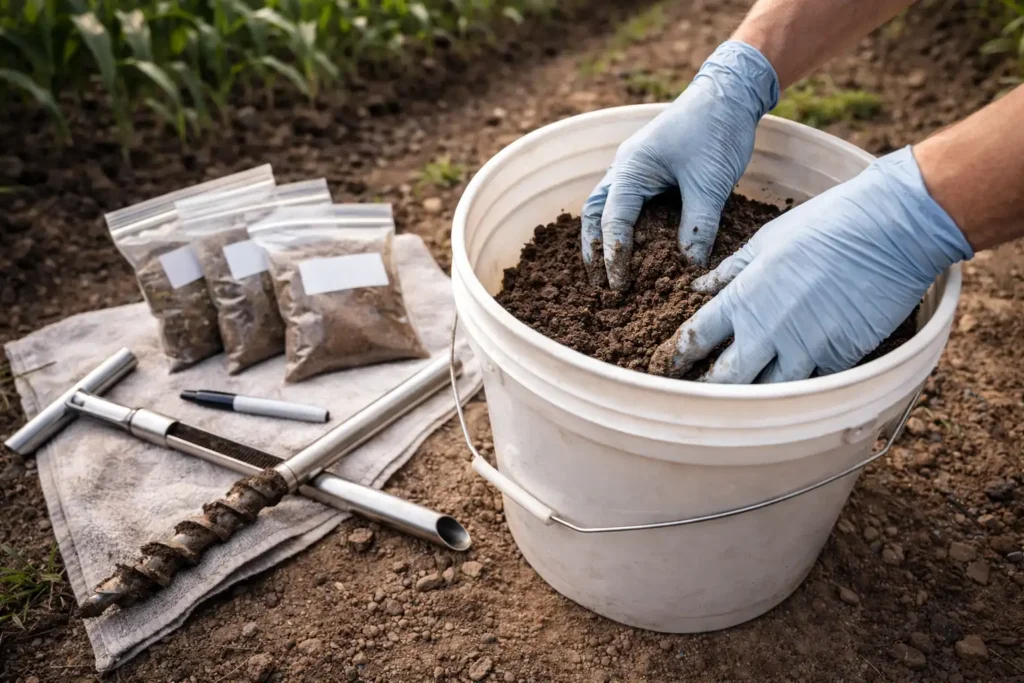
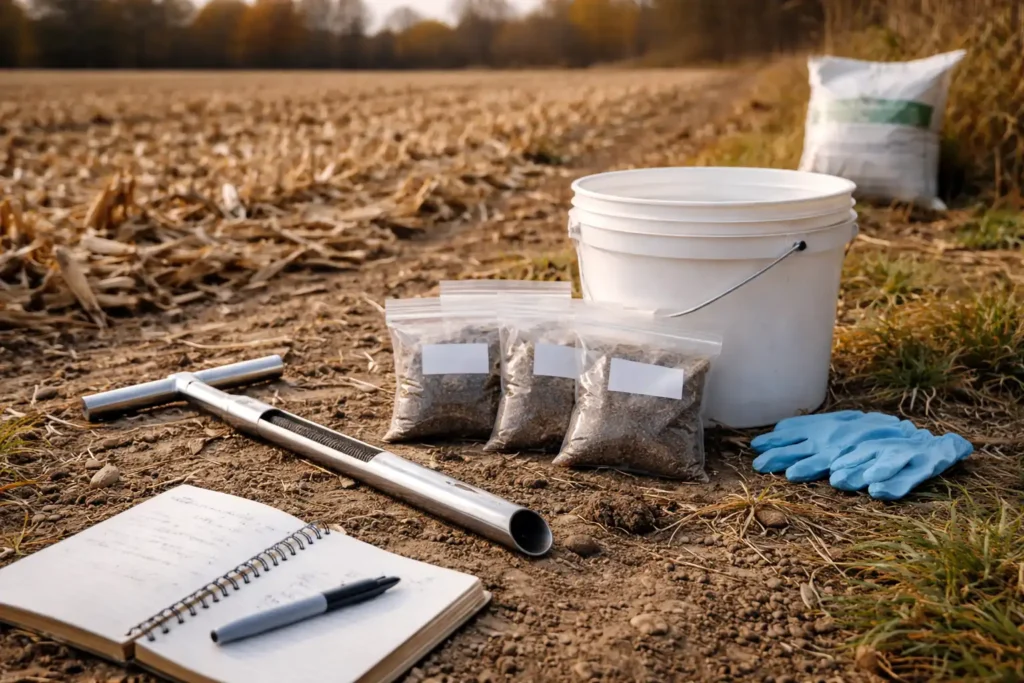
Contamination often comes from fertilizer and lime residue, dirty buckets, and tools that carry soil between zones. Use a clean plastic bucket for mixing, and wash and rinse it if it ever held fertilizer, seed treatment, or chemicals.
Clean tools between fields or sampling areas, and keep each sample labeled and separated by depth so you avoid cross-contamination. In environmental work, follow the lab’s handling rules, and use disinfectant/ethanol where appropriate for tool wiping between sites.
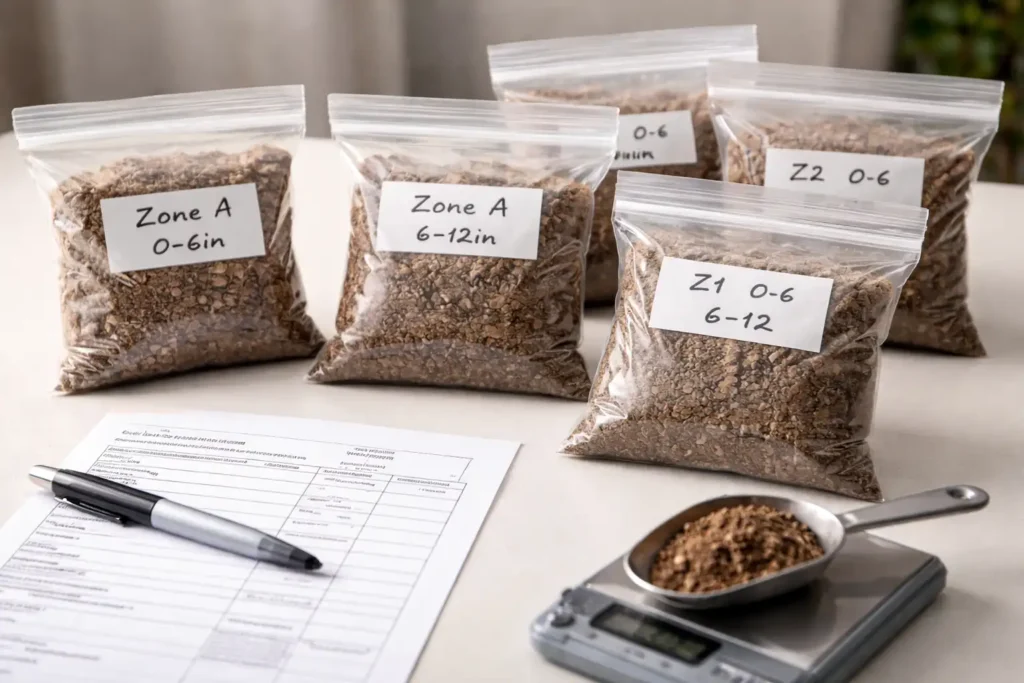
Mix, bag, and label for the lab
Mix subsamples thoroughly in your clean bucket, crumble clods by hand, and remove stones, roots, and heavy residue. Pull the lab’s required amount and place it in a soil sample bag. Label soil samples with zone name, depth, and date, then fill out the soil test form so the lab knows your crop and intent. Keep different depths separate if the lab requests separate results, and submit to lab promptly for stable reporting.
When to Sample and When to Avoid Sampling
Sample at a consistent time of year so results compare cleanly across seasons and years. Avoid sampling right after major changes that distort readings, such as after lime application, manure spreading, or a fresh fertilizer event.
Tie sample timing to your next decision, like whether you plan to lime, adjust phosphorus and potassium, or compare zones before planting. If you ask “when to take soil samples,” the practical answer is: sample timing stays consistent, and you avoid periods after manure or heavy amendments.
What Tests to Request From the Lab (And How Tools Affect Results)
Most routine packages include soil pH, lime requirement, and extractable nutrients such as phosphorus, potassium, and magnesium. Many labs also offer sulfur, nitrogen-related tests suited to region and crop, cation exchange capacity, texture, and soil organic matter.
Your soil analysis tools and method protect these results by keeping depth consistent, avoiding contamination, and producing a composite that reflects the zone. A sloppy tool choice can turn a good lab report into the wrong field decision.
Safety, Contamination Control, and Tool Cleaning
Start with safety, because tired backs and sharp steel don’t mix. Wear PPE like gloves and eye protection, and plant your feet before you push, twist, or pull. Keep hands clear of cutting edges and pinch points on handles, rods, and extensions. For deeper holes or powered gear, slow down, work with a buddy when you can, and stop if the tool binds in rock or roots for safe soil sampling.
Next, protect your results from cross contamination. Use a dedicated clean plastic bucket, and don’t set tools in fertilizer, lime, oil, or treated seed dust. Keep samples separated by field and depth, and label as you go so nothing gets mixed by accident.
Finally, clean as you move. Brush off soil, rinse with clean water, and wipe down contact surfaces between spots when needed. Always start each zone with clean sampling tools and a clean bucket.
Common Mistakes and How to Avoid Them
- Inconsistent depth: mark the tool, stop at the mark, and keep the tool straight
- Too few subsamples: increase the count and repeat the same plan each year
- Sampling odd spots: avoid headlands, manure piles, wet pockets, and banded fertilizer rows
- Using dirty or metal buckets: switch to clean plastic and keep it for sampling only
- Mixing different zones or depths: label each sample and keep depth intervals separate
- Not cleaning tools between sites: brush and wipe tools to reduce carryover
- Wrong tool for rocky or compacted ground: move from probe to auger, or use driving aids
These soil sampling mistakes create sampling errors that lead to inaccurate soil test results. If a result looks wrong, resample the same zone with the same depth and better consistency.
Tool Care, Storage, and Safety
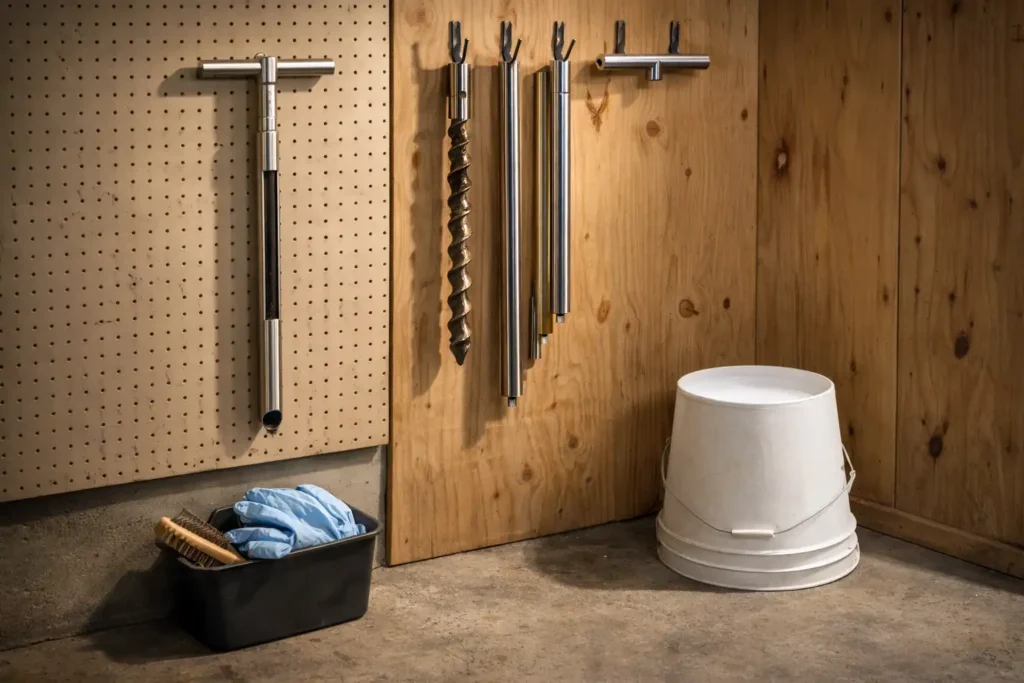
Clean your tools right after sampling. Knock off clods, rinse with clean water, and scrub the cutting edge and inside of tubes so old soil doesn’t contaminate the next sample. If you move between fields or suspect pathogens or contaminants, wipe with a suitable disinfectant, then let everything dry.
Dry and store smart. Towel-dry metal parts, leave tubes open to air-dry, and add a light oil film to prevent rust. Store probes, augers, and rods in a dry spot, and check pins, joints, and threads for looseness before the next run.
Stay safe while you work. Wear gloves and sturdy boots, keep your footing steady, and watch for sharp edges and pinch points on handles, rods, and slide hammers.
FAQs about Soil Sampling Tools
What are the best soil sampling tools for accurate soil tests?
How deep should I take a soil sample for fertilizer and pH testing?
How many cores should I collect to make one composite soil sample?
What’s the difference between a disturbed sample and an undisturbed core sample?
What sampling pattern should I use across a field?
When is the best time of year to take soil samples?
How do I clean soil sampling tools to avoid contaminating samples?
What accessories do I need besides the sampler?
Final Thoughts for Crop Farmers
The best soil sampling tools match your purpose, soil conditions, and depth targets, and you use them the same way every time. Keep samples clean, keep depths consistent, and build a composite that represents the zone. Follow your lab or extension guidance, track depth and dates, and your accurate soil test stays comparable year to year. A clean method produces a representative sample and helps you choose the right tool with confidence.